Extension SDKs are a very powerful way distribute your control libraries for use in Windows Store and Windows Phone apps.
This article will go through the layout of the extension sdk, and later take that knowledge to build an extension sdk from an already released app.
An ExtensionSDK essentially consists of 3 parts:
- Files to use during design time
- Files to deploy as content
- Assemblies to use for reference
In addition there's a metadata file 'SDKManifest.xml' that describes the content.
The root layout then looks like the following:
\EXTENSIONNAME\VERSION\DesignTime\
\EXTENSIONNAME\VERSION\Redist\
\EXTENSIONNAME\VERSION\References\
\EXTENSIONNAME\VERSION\SDKManifest.xml
…where 'EXTENSIONAME' is the name of your extension, and VERSION is version number in the format "1.2.3.4".
For each of these groups you can control what gets deployed in debug and release or both. If you don't want to control whether you use debug or release, you will below these folders use the folder 'CommonConfiguration'. For debug specific configuration use 'Debug', and for release configuration use 'Retail'. In most case you will be using 'CommonConfiguration' though.
This means our folder structure now looks like this:
\EXTENSIONNAME\VERSION\DesignTime\CommonConfiguration\
\EXTENSIONNAME\VERSION\Redist\CommonConfiguration\
\EXTENSIONNAME\VERSION\References\CommonConfiguration\
Next level down in the folders describe if files are related to AnyCPU, x86, x64 or ARM builds (the latter is very useful for C++ projects). For AnyCPU use 'neutral', meaning it doesn't matter. So use this for .NET Assemblies compiled for AnyCPU, image resources, winmd files etc. You will want to use the architecture specific folder if you deploy binaries that are architecture specific.
So what goes in what folders:
- DesignTime: This is where you will put .Design assemblies if you have specific design time binaries for your assemblies, as well as Generic.xaml. You only need to deploy 'neutral' and/or 'x86' architectures, since VS runs in a 32bit process.
- Redist: Images, shaders, Generic.xbf, videos etc, AND C++ binaries.
- References: .NET DLLs, C++ WinMDs, xml doc.
Here's an example layout of an extension sdk that consists of two libraries: One C++ WinRT component (NativeLib) and a Managed library:
\MyControlLib\1.0.0.0\SDKManifest.xml
\MyControlLib\1.0.0.0\DesignTime\CommonConfiguration\neutral\ManagedLib\Themes\Generic.xaml
\MyControlLib\1.0.0.0\DesignTime\CommonConfiguration\x86\ManagedLib.Design.dll
\MyControlLib\1.0.0.0\Redist\CommonConfiguration\neutral\ManagedLib.pri
\MyControlLib\1.0.0.0\Redist\CommonConfiguration\neutral\NativeLib.pri
\MyControlLib\1.0.0.0\Redist\CommonConfiguration\neutral\ManagedLib\Icon.png
\MyControlLib\1.0.0.0\Redist\CommonConfiguration\neutral\ManagedLib\Themes\Generic.xbf
\MyControlLib\1.0.0.0\Redist\CommonConfiguration\neutral\NativeLib\shaders\PixelShader.cso
\MyControlLib\1.0.0.0\Redist\CommonConfiguration\neutral\NativeLib\shaders\VertexShader.cso
\MyControlLib\1.0.0.0\Redist\CommonConfiguration\ARM\NativeLib.dll
\MyControlLib\1.0.0.0\Redist\CommonConfiguration\x86\NativeLib.dll
\MyControlLib\1.0.0.0\Redist\CommonConfiguration\x64\NativeLib.dll
\MyControlLib\1.0.0.0\References\CommonConfiguration\neutral\NativeLib.winmd
\MyControlLib\1.0.0.0\References\CommonConfiguration\ARM\ManagedLib.dll
\MyControlLib\1.0.0.0\References\CommonConfiguration\ARM\ManagedLib.xml
\MyControlLib\1.0.0.0\References\CommonConfiguration\x64\ManagedLib.dll
\MyControlLib\1.0.0.0\References\CommonConfiguration\x64\ManagedLib.xml
\MyControlLib\1.0.0.0\References\CommonConfiguration\x86\ManagedLib.dll
\MyControlLib\1.0.0.0\References\CommonConfiguration\x86\ManagedLib.xml
The SDKManifest could look like the following:
<?xml version="1.0" encoding="utf-8" ?>
<FileList
xmlns:xsi="http://www.w3.org/2001/XMLSchema-instance"
xsi:noNamespaceSchemaLocation="SDKManifest.xsd"
DisplayName="My Super Duper Control Library"
ProductFamilyName="MyControlLib"
Description="My Control Library"
MinVSVersion="12.0"
Identity="MyControlLib, Version=1.0.0.0"
MinToolsVersion="12.0"
AppliesTo="WindowsAppContainer + ( Managed )"
SupportedArchitectures="x86;x64;ARM"
DependsOn="Microsoft.VCLibs, version=12.0"
SupportsMultipleVersions="Error">
<File Reference="NativeLib.winmd" Implementation="NativeLib.dll" />
<File Reference="ManagedLib.dll"/>
</FileList>
Note that if you don't have native dependencies, this would change quite a lot. The full set of properties are pretty poorly documented today, so generally I download and install a wealth of extension sdks and look at them and see if they do similar things to me and then copy from that.
Building an Extension SDK from an installed app
So now that we know the layout of an extension sdk, let us apply that to 'reverse-engineering' an already deployed app into an extension sdk and use that to build our own app on top. Because Windows Store apps aren't fully encrypted, this means you can often take parts of an app that's separated out into libraries and build a new app from these libraries. This is something to consider when you build your app - if you are really good are separating your stuff into sub-libraries, you also make it easier for others to reuse your stuff. As an example let's download the Bing Maps Preview app and reverse it into an SDK and build our own 3D Map App.
When you installed the app, you will be able to access a folder with a name similar to the following with administrator rights:
"c:\Program Files\WindowsApps\Microsoft.Maps3DPreview_2.1.2326.2333_x64__8wekyb3d8bbwe\"
In here we'll find a lot of logic for the app, but the main one we are interested in is the "Bing.Maps" folder and the Bing.Maps dll+winmd. The folder is essentially the content and is image resources and shaders. The Bing Maps.dll and Winmd are C++ WinRT components. Since the dll is C++, the architecture will either be ARM, x86 or x64 depending on what PC you downloaded it on. In my case it's x64 so I should be able to build an extension sdk that will support 64 bit PCs from this alone. If I want to support more, I will have to install the app on a x86 or ARM PC and copy the dll from there as well (the other files are neutral and will be the same).
So let's first create the following folder : "Bing.Maps\1.0.0.0\".
Next, let's copy the "Bing.Maps" folder that has all the images and shaders into
\Bing.Maps\1.0.0.0\Redist\CommonConfiguration\neutral\Bing.Maps\
Next copy the Bing.Maps.dll into (x64 if that's what you have, change/add ARM/x86 if your binary isn't x64)
\Bing.Maps\1.0.0.0\Redist\CommonConfiguration\x64\Bing.Maps.dll
Lastly, copy the Bing.Maps.winmd into:
\Bing.Maps\1.0.0.0\References\CommonConfiguration\neutral\Bing.Maps.winmd
Lastly we need to create a new file in \Bing.Maps\1.0.0.0\SDKManifest.xml to describe the SDK:
<?xml version="1.0" encoding="utf-8" ?>
<FileList
xmlns:xsi="http://www.w3.org/2001/XMLSchema-instance"
xsi:noNamespaceSchemaLocation="SDKManifest.xsd"
DisplayName="Bing Maps"
ProductFamilyName="Bing.Maps"
MinVSVersion="12.0"
Identity="Bing.Maps, Version=1.0.0.0"
MinToolsVersion="12.0"
AppliesTo="WindowsAppContainer"
SupportedArchitectures="x86;x64;ARM"
DependsOn="Microsoft.VCLibs, version=12.0"
SupportsMultipleVersions="Error">
<File Reference="Bing.Maps.winmd" Implementation="Bing.Maps.dll" />
</FileList>
Voila! We now have an ExtensionSDK. There's several ways you can 'install' this into Visual Studio. The simplest way is to copy the folder into your user folder under %USERPROFILE%\AppData\Local\Microsoft SDKs\<target platform>\v<platform version number>\ExtensionSDKs.
In this case %USERPROFILE%\AppData\Local\Microsoft SDKs\Windows\v8.1\ExtensionSDKs\
If you're building an installer you can also install it into
%Program Files%\Microsoft SDKs\Windows\v8.1\ExtensionSDKs
Or specify a link to the location of the folder in a registry key:
HKLM\Software\Microsoft\Microsoft SDKs\Windows\v8.1\ExtensionSDKs\Bing.Maps\1.0.0.0\
Lastly you can do this in your project file by using the 'SDKReferenceDirectoryRoot' tag. Add the following right before the <Target Name="BeforeBuild"/> tag at the very bottom.
<PropertyGroup>
<SDKReferenceDirectoryRoot>c:\myfolder\my_sdks\;$(SDKReferenceDirectoryRoot)</SDKReferenceDirectoryRoot>
</PropertyGroup>
Note that for the latter, the folder should point to a root extension sdk folder, meaning the SDK above must be located in a certain tree under this folder. In this case:
c:\myfolder\my_sdks\Windows\v8.1\ExtensionSDKs\Bing.Maps
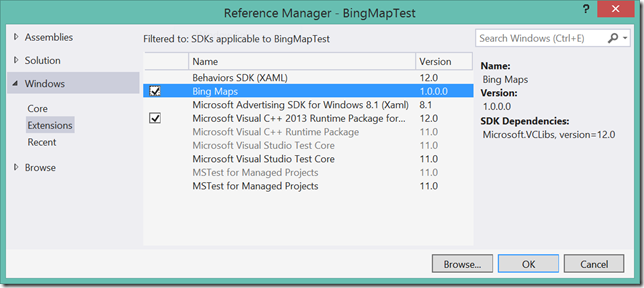
When you've done any of these install options, you can now get started building an app. Go to "Add References" and the Bing Maps entry should show up.

Now add the following XAML to your page:
<bing:Map x:Name="map" xmlns:bing="using:Bing.Maps">
<bing:Map.MapProjection>
<bing:ThreeDimensionalMapProjection />
</bing:Map.MapProjection>
</bing:Map>
And in code-behind after "InitializeComponents":
map.BaseLayers = Bing.Maps.BaseLayers.CreatePhotoRealisticOverlay();
Run the app and you should see a 3D globe!

Note: This Bing Maps SDK is not based on anything officially released but on a un-finished app. This is by all means a giant hack and only meant as an exercise to build an Extension SDK. Use this at your own risk and don’t attempt to publish any apps using it.
References: