I recently had to lay out some text vertically stacked on top of each other in Windows 8, similar to how tabs in Visual Studio are laid out.
The obvious way to do that would be to first place the texts in a stack panel, and then rotate them like so:
<StackPanel>
    <TextBlock Text="Text 1">
        <TextBlock.RenderTransform>
            <RotateTransform Angle="90" />
        </TextBlock.RenderTransform>
    </TextBlock>
    <TextBlock Text="Text 2">
        <TextBlock.RenderTransform>
            <RotateTransform Angle="90" />
        </TextBlock.RenderTransform>
    </TextBlock>
    <TextBlock Text="Text 3">
        <TextBlock.RenderTransform>
            <RotateTransform Angle="90" />
        </TextBlock.RenderTransform>
    </TextBlock>
</StackPanel>
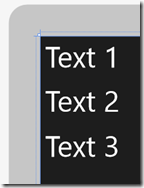
This is what it looks like without the RotateTransform:
And after adding rotation:
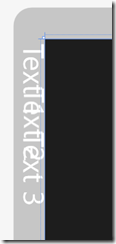
Notice how the text is now outside the containing StackPanel, and overlapping each other? So what happened? The problem is that RenderTransform is applied AFTER the layout cycle occurs so StackPanel has no way of placing these elements, since it already did it’s job prior to rotating the text. We’ll get back to how to resolve this, but let’s first cover the layout cycle, which consists of two steps: Measure and Arrange.
In the Measure step, each TextBlock is measured. This is basically the step where the parent control – in this case the StackPanel – tells each TextBlock “If you have [x,y] space, how much of that would you like to have?”. It does this by calling TextBlock.Measure(Size) on each of them. The TextBlock then reports back the size it would like to have using the .DesiredSize property. You will notice that controls’ DesiredSize property will always return (0,0) until the Measure step has run. Usually for TextBlocks it would report back the size of the text. If the text doesn’t fit within the width that the StackPanel provided and TextWrapping was enabled on the TextBlock, the TextBlock might choose to break the text and report a taller height instead, so it can keep inside the width it was provided with.
The next step is the Arrange step. This occurs after all children has been measured, and the StackPanel here decides how much space it will provide to each control. While the TextBlocks provided a certain DesiredSize, they might not actually get that much space – that’s all up to the parent control – for instance for a Grid’s columns and rows with auto and * sizes, the measure step helped it determine how much space each row and column will be, and then applies that to each element during arrange. Arrange is done by calling .Arrange(Rect) on each element, providing them with a rectangle to place itself within.
So back to our problem: How can we use this knowledge to get the layout cycle to proper place my rotated textblocks?
Well first of all, when we rotate an element 90 degrees, the width of the text becomes the height, and vice-versa. So if we were to “swap” the width and height during Arrange, we should be able to prevent the overlapping and ensure that there’s enough width, errr height for each TextBlock so they don’t overlap. During the arrange step, we can ensure that the elements gets placed right and doesn’t end up outside the containing control.
To do that, the first thing we’ll do is create a new control. Add a new TemplatedControl to your project:
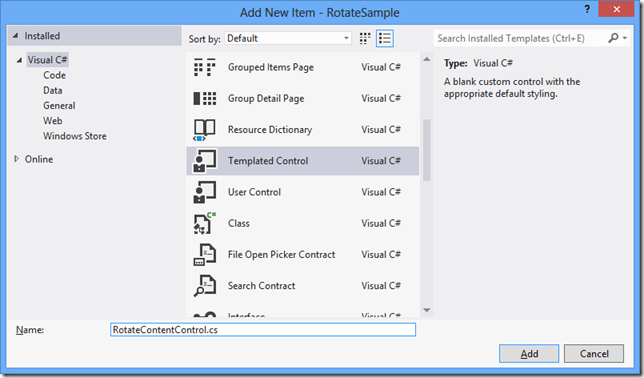
A new class inheriting from Control will be created, as well as a new \Themes\Generic.xaml template (if you already have a Generic.xaml file, the following will be added):
Let’s get rid of the Border in this template, and add a simple ContentControl instead:
<ResourceDictionary
    xmlns="http://schemas.microsoft.com/winfx/2006/xaml/presentation"
    xmlns:x="http://schemas.microsoft.com/winfx/2006/xaml"
    xmlns:local="using:RotateSample">

    <Style TargetType="local:RotateContentControl">
        <Setter Property="Template">
            <Setter.Value>
                <ControlTemplate TargetType="local:RotateContentControl">
                    <Border
                        Background="{TemplateBinding Background}"
                        BorderBrush="{TemplateBinding BorderBrush}"
                        BorderThickness="{TemplateBinding BorderThickness}">
                    </Border>
                    <ContentControl x:Name="Content" Content="{TemplateBinding Content}" />
                </ControlTemplate>
            </Setter.Value>
        </Setter>
    </Style>
</ResourceDictionary>
Next let’s add a Content dependency property to our class so that we can bind to the content. We’ll also add a Content property to the class, to signify that anything that is used as content inside this control in XAML is meant to be assigned to the Content property. Our control now looks like this:
[Windows.UI.Xaml.Markup.ContentProperty(Name="Content")]
public sealed class RotateContentControl : Control
{
    public RotateContentControl()
    {
        this.DefaultStyleKey = typeof(RotateContentControl);
    }

    public object Content
    {
        get { return (object)GetValue(ContentProperty); }
        set { SetValue(ContentProperty, value); }
    }

    public static readonly DependencyProperty ContentProperty =
        DependencyProperty.Register("Content", typeof(object), typeof(RotateContentControl), null);
}
Now if we were to run the app using this control, it’ll basically be the same as using a ContentControl.
<local:RotateContentControl>
    <TextBlock Text="Text 1" FontSize="32" Margin="5" />
</local:RotateContentControl>
Of course this is not much fun, so let’s first use the OnApplyTemplate to grab the content and apply the rotation to the content:
private ContentControl m_Content;
private const double rotation = 90;
protected override void OnApplyTemplate()
{
    m_Content = GetTemplateChild("Content") as ContentControl;
    if (m_Content != null)
    {
        m_Content.RenderTransform = new RotateTransform() { Angle = rotation };
    }
    base.OnApplyTemplate();
}
If you run the sample now, we’ll basically be back to where we started with the texts offset and placed outside the parent container. You can see that the StackPanel is highlighted below with the size it thinks it needs to be to hold the TextBlocks, which doesn’t match the actual size of the TextBlocks:
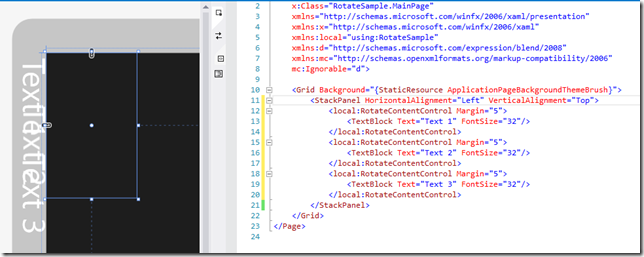
So let’s first override the Measure step and swap width and heights:
protected override Windows.Foundation.Size MeasureOverride(Windows.Foundation.Size availableSize)
{
    if (m_Content != null)
    {
        m_Content.Measure(new Size(availableSize.Height, availableSize.Width));
        return new Size(m_Content.DesiredSize.Height, m_Content.DesiredSize.Width);
    }
    else
        return base.MeasureOverride(availableSize);
}
You’ll now see the following happen – notice how the height and width is now correct for the StackPanel if the TextBlocks were rendered in the right place, but we start seeing clipping on the TextBlocks:
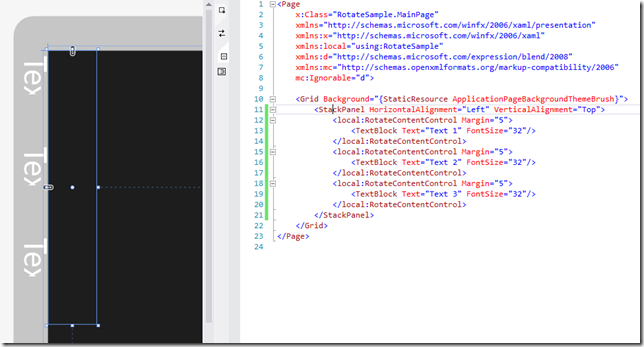
This happens because the ArrangeStep still uses the unswapped width/height and causes clipping. Let’s next override the Arrange and swap width and height here as well:
protected override Size ArrangeOverride(Size finalSize)
{
    if (m_Content != null)
    {
        m_Content.Arrange(new Rect(new Point(0, 0),
                                   new Size(finalSize.Height, finalSize.Width)));
        return finalSize;
    }
    else
        return base.ArrangeOverride(finalSize);
}
And the result we get is:
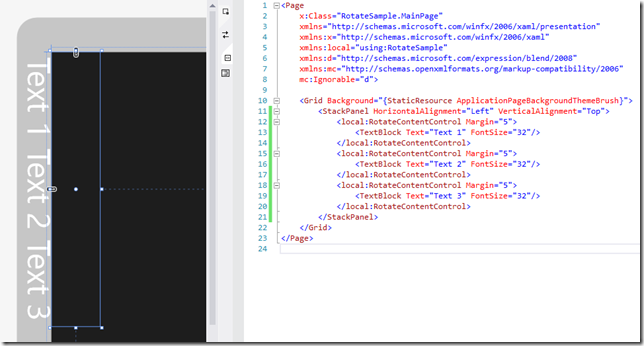
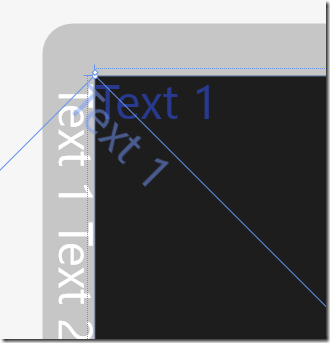
Now the text are not overlapping any longer nor are they clipped, but we still get them placed outside the parent StackPanel. This is because the rotation happens around the upper left corner and pushes the text out, as illustrated here:
Luckily the fix is easy because the Arrange step allows us to specify where to place the element as well. We basically have to move the TextBlock over to the left by the height of the text, so instead of specifying (0,0) for the rectangle corner, we use (width,0), so our Arrange looks like this:
protected override Size ArrangeOverride(Size finalSize)
{
    if (m_Content != null)
    {
        m_Content.Arrange(new Rect(new Point(finalSize.Width, 0), new Size(finalSize.Height, finalSize.Width)));
        return finalSize;
    }
    else
        return base.ArrangeOverride(finalSize);
}
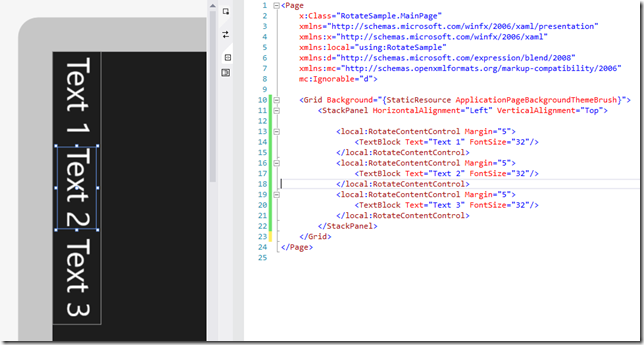
And our controls now flows correctly within the StackPanel:
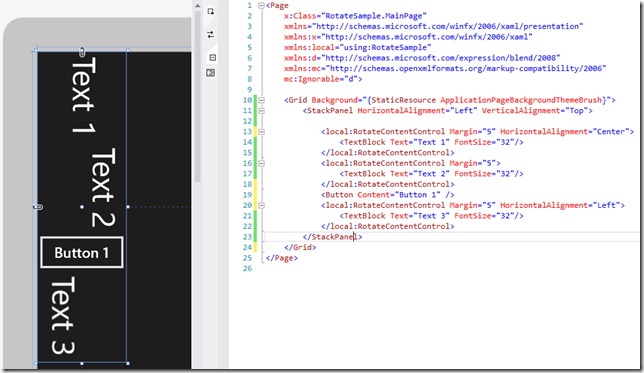
It also plays nice with other controls and respects alignments:
If you want to rotate the content –90 degrees, the offset in arrange changes slightly to:
m_Content.Arrange(new Rect(new Point(0, finalSize.Height),
                  new Size(finalSize.Height, finalSize.Width)));
We could make this a property on our control, so you can easily change direction on the fly. We’ll add a new Direction enumeration and a DependencyProperty that triggers Arrange when it changes:
public RotateDirection Direction
{
    get { return (RotateDirection)GetValue(DirectionProperty); }
    set { SetValue(DirectionProperty, value); }
}

public static readonly DependencyProperty DirectionProperty =
    DependencyProperty.Register("Direction", typeof(RotateDirection),
    typeof(RotateContentControl), new PropertyMetadata(RotateDirection.Down, OnDirectionPropertyChanged));

public static void OnDirectionPropertyChanged(DependencyObject d, DependencyPropertyChangedEventArgs e)
{
    (d as RotateContentControl).InvalidateArrange(); //Trigger reflow
}
We’ll also use remove the RenderTransform setting from OnApplyTemplate, and instead set it in ArrangeOverride, so that now looks like this:
protected override Size ArrangeOverride(Size finalSize)
{
    if (m_Content != null)
    {
        m_Content.RenderTransform = new RotateTransform() { Angle = (int)this.Direction };
        if (Direction == RotateDirection.Down)
            m_Content.Arrange(new Rect(new Point(finalSize.Width, 0),
                              new Size(finalSize.Height, finalSize.Width)));
        else if (Direction == RotateDirection.Up)
            m_Content.Arrange(new Rect(new Point(0, finalSize.Height),
                              new Size(finalSize.Height, finalSize.Width)));
        return finalSize;
    }
    else
        return base.ArrangeOverride(finalSize);
}
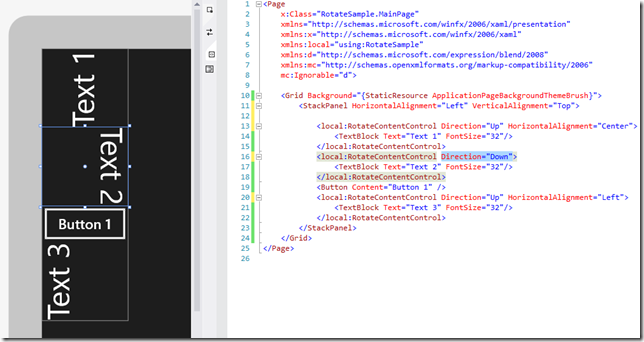
So here’s what that looks like in the designer:
That’s it! Below is the entire source code including support for 0 and 180 degree rotations as well:
using Windows.Foundation;
using Windows.UI.Xaml;
using Windows.UI.Xaml.Controls;
using Windows.UI.Xaml.Media;

namespace RotateSample
{
    [Windows.UI.Xaml.Markup.ContentProperty(Name="Content")]
    public sealed class RotateContentControl : Control
    {
        private ContentControl m_Content;

        public RotateContentControl()
        {
            this.DefaultStyleKey = typeof(RotateContentControl);
        }

        protected override void OnApplyTemplate()
        {
            m_Content = GetTemplateChild("Content") as ContentControl;
            base.OnApplyTemplate();
        }

        protected override Windows.Foundation.Size MeasureOverride(Windows.Foundation.Size availableSize)
        {
            if (m_Content != null)
            {
                if (((int)Direction) % 180 == 90)
                {
                    m_Content.Measure(new Windows.Foundation.Size(availableSize.Height, availableSize.Width));
                    return new Size(m_Content.DesiredSize.Height, m_Content.DesiredSize.Width);
                }
                else
                {
                    m_Content.Measure(availableSize);
                    return m_Content.DesiredSize;
                }
            }
            else
                return base.MeasureOverride(availableSize);
        }

        protected override Size ArrangeOverride(Size finalSize)
        {
            if (m_Content != null)
            {
                m_Content.RenderTransform = new RotateTransform() { Angle = (int)this.Direction };
                if (Direction == RotateDirection.Up)
                    m_Content.Arrange(new Rect(new Point(0, finalSize.Height),
                                      new Size(finalSize.Height, finalSize.Width)));
                else if (Direction == RotateDirection.Down)
                    m_Content.Arrange(new Rect(new Point(finalSize.Width, 0),
                                      new Size(finalSize.Height, finalSize.Width)));
                else if (Direction == RotateDirection.UpsideDown)
                    m_Content.Arrange(new Rect(new Point(finalSize.Width, finalSize.Height), finalSize));
                else
                    m_Content.Arrange(new Rect(new Point(), finalSize));
                return finalSize;
            }
            else
                return base.ArrangeOverride(finalSize);
        }


        public object Content
        {
            get { return (object)GetValue(ContentProperty); }
            set { SetValue(ContentProperty, value); }
        }

        public static readonly DependencyProperty ContentProperty =
            DependencyProperty.Register("Content", typeof(object), typeof(RotateContentControl), null);

        public enum RotateDirection : int
        {
            Normal = 0,
            Down = 90,
            UpsideDown = 180,
            Up = 270
        }

        public RotateDirection Direction
        {
            get { return (RotateDirection)GetValue(DirectionProperty); }
            set { SetValue(DirectionProperty, value); }
        }

        public static readonly DependencyProperty DirectionProperty =
            DependencyProperty.Register("Direction", typeof(RotateDirection),
            typeof(RotateContentControl), new PropertyMetadata(RotateDirection.Down, OnDirectionPropertyChanged));

        public static void OnDirectionPropertyChanged(DependencyObject d, DependencyPropertyChangedEventArgs e)
        {
            if(((int)e.OldValue) % 180 == ((int)e.NewValue) % 180)
                (d as RotateContentControl).InvalidateArrange(); //flipping 180 degrees only changes flow not size
            else
                (d as RotateContentControl).InvalidateMeasure(); //flipping 90 or 270 degrees changes size too, so remeasure
        }
    }
}
Note: While this article was written for Windows Store apps, these concepts apply directly to Silverlight, WPF and Windows Phone as well, albeit they already provide controls in the Toolkit (LayoutTransformer) to handle this.