Building custom XAML control panels

One of my favorite XAML Control primitives is the Panel class. It's what drives Grid, StackPanel, Canvas and many many other controls that contains a set of other controls, and controls layout the children out in the view.

So in my second twitch stream, I walked through creating a custom panel that lays out controls in a grid-like manner, without having to do all the row and column definitions. It mainly focuses on the Arrange and Measure steps in the layout life-cycle, which applies to both WPF, UWP and WinUI (or even Silverlight for that matter ;-). And just for fun I used the latest WinUI 3.0 Alpha release (but it really doesn't matter as the concepts are the exact same - only namespaces differs). 


And please subscribe to my YouTube and Twitch channels!

Building an ARM64 Windows Universal App

If you read the recently release documentation on Windows 10 on ARM, you get the impression you can only build x86 and ARM 32bit applications.

However it is completely possible today to build and run a native ARM64 UWP application as long as you use C++ (.NET isn’t - at this point at least - supported). I’ll detail the steps below:

First we need to ensure you have the ARM64 C++ compiler pieces installed. Open the Visual Studio installer and ensure the ARM64 components are installed:

image

Next we create a new UWP C++ Application:

image

Open the configuration manager, and select a new solution platform:

ConfigManager

Pick ARM64:

ConfigManager2

In the project properties you can now also see that the Target Machine is set to MachineARM64:

ProjectProperties

Now all you have to do is compile the app. Or well… maybe not!

BuildError

This build error occurs due to a but in the .targets file, ARM64 isn’t really fully supported yet, and some of the build settings isn’t expecting ARM64. Luckily it’s hitting a part that isn’t needed, so we can trick MSBuild to skip over this.

Open your .vcxproj project file and add the following fake property:

<ProjectNTagets>Some silly value here </ProjectNTagets>

ProjectFix

And Voila! Your project should now compile:

BuildSuccess

Next we can create a new app package. ARM64 should now show up in the list, and you can check that on as well, to generate a package that runs natively on any architecture Windows ships on:

CreatePackageDialog

Success!

PackageCreationComplete

That’s all there is to it!

Now next is to get hold of an ARM64 device and figure out how to deploy and debug this. Once I have a device, I’ll post the next blog…

The beginnings of an AllJoyn based Home Automation Controller

I’ve been working on building my own home automation controller to make my home smarter. I decided to build this around AllJoyn so I can avoid getting any type of device-protocol lock-in, but can abstract everything with AllJoyn.

I’m currently at a stage where I have several, lights, switches, temperature, humidity and door/window sensors, as well as a way to directly read my house’s SmartMeter to get real-time power consumption, all exposed via AllJoyn.

Since I want to build a controller; that can pick up any AllJoyn device at runtime, without the need to have a preconfigured list of supported device types, I needed a way to discover any device without any prior knowledge. Luckily there’s a great library with full source from Microsoft that does just this, and I wrapped it all up into a little NuGet package, and wrote an article on how to use it on Hackster here: https://www.hackster.io/dotMorten/discovering-and-interacting-with-any-alljoyn-device-0dbd86


I’m excited to be going to CES2016 for a few days this week, and will be meeting with the AllSeen Alliance who has a big presence there, and get some inspiration and hopefully get some questions answered, before moving forward with my controller.

Here’s a few photos of it all running on a Raspberry PI with a little 5” display.

WP_20151026_11_34_30_Pro

Home screen


WP_20151222_12_58_27_Rich_LI

Tracking power consumption over time.


image

Automation Rule Designer


Just some of the AllJoyn devices in my house…

First release of WindowsStateTriggers

With the release of the Windows 10 Universal SDK today I’ve updated the Github Repository for the WindowsStateTriggers for the final SDK. Go grab the source code today!

During the beta period I’ve received several great fixes and additions from the community. Thank you all who contributed!

The Nuget package is available here: https://www.nuget.org/packages/WindowsStateTriggers

Get full source here: https://github.com/dotMorten/WindowsStateTriggers


See the WIKI or Test App for usage some usage examples.

Displaying a backbutton on your app title bar

Disclaimer: This article is written based on Windows 10 Tech Preview – Build 10122. Things might change completely in the future.

Some of the Windows 10 apps have a back button at the top of the app bar. Here’s an example in the Settings Control Panel:

image

We can add this to our own apps but using the SystemNavigationManager’s AppViewBackButtonVisibility.

Here’s how that will look like:

SystemNavigationManager.GetForCurrentView().AppViewBackButtonVisibility = AppViewBackButtonVisibility.Visible;

When you run this code you’ll now also see the exact same back button in your Windows UWP Desktop app! No need to waste precious screen real-estate when there’s room on the top bar.

Of course for Windows Phone this isn’t really needed (although nothing seems to happen if you call this API), call it anyway, just in case you're running on a device that can show the backbutton - it seems like it just doesn't show on devices with hardware:


   //Show UI back button - do it on each page navigation
   if (Frame.CanGoBack)
      SystemNavigationManager.GetForCurrentView().AppViewBackButtonVisibility = AppViewBackButtonVisibility.Visible;
   else
      SystemNavigationManager.GetForCurrentView().AppViewBackButtonVisibility = AppViewBackButtonVisibility.Collapsed;


   //Hook up back buttons - Do this just once - ie on app launched
   SystemNavigationManager.GetForCurrentView().BackRequested += (s, e) =>
   {
       if (Frame.CanGoBack)
           Frame.GoBack();
   };
   if (Windows.Foundation.Metadata.ApiInformation.IsTypePresent("Windows.Phone.UI.Input.HardwareButtons"))
   {
       //Also use hardware back button
       Windows.Phone.UI.Input.HardwareButtons.BackPressed += (s, e) =>
       {
           if (Frame.CanGoBack)
           {
               e.Handled = true;
               Frame.GoBack();
           }
       };
   }

Now you get back button support in both desktop and phone apps when you can navigate back!

Unfortunately the BackRequested and BackPressed event arguments are different, so you can’t reuse the same event handler for both. That’s quite a shame – I hope Microsoft will be cleaning that up soon.

Creating DeviceFamily specific layouts in a Universal App

Disclaimer: This article is written based on Windows 10 Tech Preview – Build 10041. Things might change completely in the future.

In an earlier post, I showed how to use a StateTrigger to adapt parts of your UI to a specific device family (Device families are: Windows Desktop, Windows Mobile, XBox, IoT etc).

However if you want to do major differences in your UI, that’s probably not the most efficient way. Windows 10 comes with a nice trick to use completely different XAML files based on the device family you’re running on.

Let’s first create a new blank UAP project, and add the following XAML to the main <Grid> on MainPage.xaml

<Grid Background="{ThemeResource ApplicationPageBackgroundThemeBrush}">
 
    <TextBlock Text="Hello Windows Desktop"
                HorizontalAlignment="Center"
                VerticalAlignment="Center"
                />        
 
</Grid>


When you run this on Desktop,you not surprisingly get this:

image

And also not surprising you get this on Windows Phone:

image

Now what we want to do is override the MainPage.xaml for Windows Phone and display a more correct message.

First create a new folder called DeviceFamily-[family] where [family] is ‘Mobile’:

image

Right-click this folder and choose “Add new item”

image

Pick “Xaml View” and change the name to “MainPage.xaml” This page is similar to a blank page; but is for overriding specific XAML pages – ie it doesn’t include the code behind, which you already have.

Now add the new TextBlock to this page with a more device family specific message:

<Grid Background="{ThemeResource ApplicationPageBackgroundThemeBrush}">
 
    <TextBlock Text="Hello Windows Phone" 
                HorizontalAlignment="Center"
                VerticalAlignment="Center" />
        
</Grid>

Because this XAML file ii in the DeviceFamily-Mobile, when running on Windows mobile, this XAML will be used instead of the default MainPage.xaml defined in the root of the project

image

So this method enables you to completely override the UI and adapt for the device family and maintain the same code-behind.

Using Windows 10’s Extended Execution

Disclaimer: This article is written based on Windows 10 Tech Preview – Build 10041. Things might change completely in the future.

On Windows Phone Silverlight 8.0 it was possible to continue run an while the app wasn’t foregrounded. This was useful for Turn-by-turn or run-tracker type of apps. So even if you got a phone call or turned the screen off, the app would continue to run. Unfortunately that functionality was removed (well not removed, but rejected in certification) from Windows Phone Silverlight 8.1, and it was never added to Windows Runtime apps. That meant you were pretty much stuck on Silverlight 8.0 if you were building any of these apps.

However, in Windows 10 the functionality is finally here with the Windows Runtime! There’s not a lot of doc on it, and especially on phone it seems rather buggy, but I’ll try and explain the gist of it here.

First let’s create a new app, and add some basic location tracking to it.

private Geolocator locator;
private ObservableCollection<string> coordinates = new ObservableCollection<string>();
public MainPage()
{
    this.InitializeComponent();
    locator = new Geolocator();
    locator.DesiredAccuracy = PositionAccuracy.High;
    locator.DesiredAccuracyInMeters = 0;
    locator.MovementThreshold = 0;
    locator.PositionChanged += Locator_PositionChanged;
    coords.ItemsSource = coordinates;
}
 
private void Locator_PositionChanged(Geolocator sender, PositionChangedEventArgs args)
{
    var coord = args.Position;
    string position = string.Format("{0},{1}",
        args.Position.Coordinate.Point.Position.Latitude, //yeah it's this deep! Surprised smile
        args.Position.Coordinate.Point.Position.Longitude);
    var _ = Dispatcher.RunAsync(CoreDispatcherPriority.Normal, () =>
    {
        coordinates.Insert(0, position);
    });
}

And add the following ListView to the main page:

<ListView x:Name="coords" />

When you run this app, you’ll start seeing coordinates getting added to the list about once every second.

Now if you were to minimize the app (if you run as a desktop app – not a phone app), and return to the app, you might notice that the app still got coordinates added while it was minimized. That’s probably because you had the debugger attached. Try running the app without Visual Studio debugging, and you’ll notice the app will completely pause when it’s minimized. That means the app will stop tracking you if it’s not active. So first lesson: The Visual Studio debugger lies to you and prevents the app from suspending.

If we want to continue running the app while another app is active (or on a phone get an unexpected phone call), we now have a new “Extended Execution” session that we can start.

private ExtendedExecutionSession session;
 
private async void StartLocationExtensionSession()
{
   session = new ExtendedExecutionSession();
   session.Description = "Location Tracker";
   session.Reason = ExtendedExecutionReason.LocationTracking;
   session.Revoked += ExtendedExecutionSession_Revoked;
   var result = await session.RequestExtensionAsync();
   if (result == ExtendedExecutionResult.Denied)
   {
       //TODO: handle denied
   }
}

This tells the app that we’d like to continue even if the app is backgrounded. So you would usually call this API when you start running or doing your route.

Similarly we can stop the execution by disposing the session:

if (session != null)
{
    session.Dispose();
    session = null;
}

You would typically call this at the end of the run or when you reach your destination.

The only piece we’re missing is the Revoked event – I’m not entirely sure when this fires (there’s no documentation available yet), but on the Windows Phone emulator it fires the moment you leave the app, so I haven’t been able to get this working there.

private void ExtendedExecutionSession_Revoked(ExtendedExecutionSession sender, ExtensionRevokedEventArgs args)
{
    //TODO: clean up session data
    StopLocationExtensionSession();
}

Now add this to your app and call the StartLocationExtensionSession method and minimize your app. Wait a little and come back to it – note that points have been collected while the app wasn’t active. So now you can go write your run tracker app for Windows Desktop and take your desktop computer for a run… or wait for a Windows Phone 10 build where it’s working Smile

Using Custom Visual State Triggers

Disclaimer: This article is written based on Windows 10 Tech Preview – Build 10041. Things might change completely in the future.

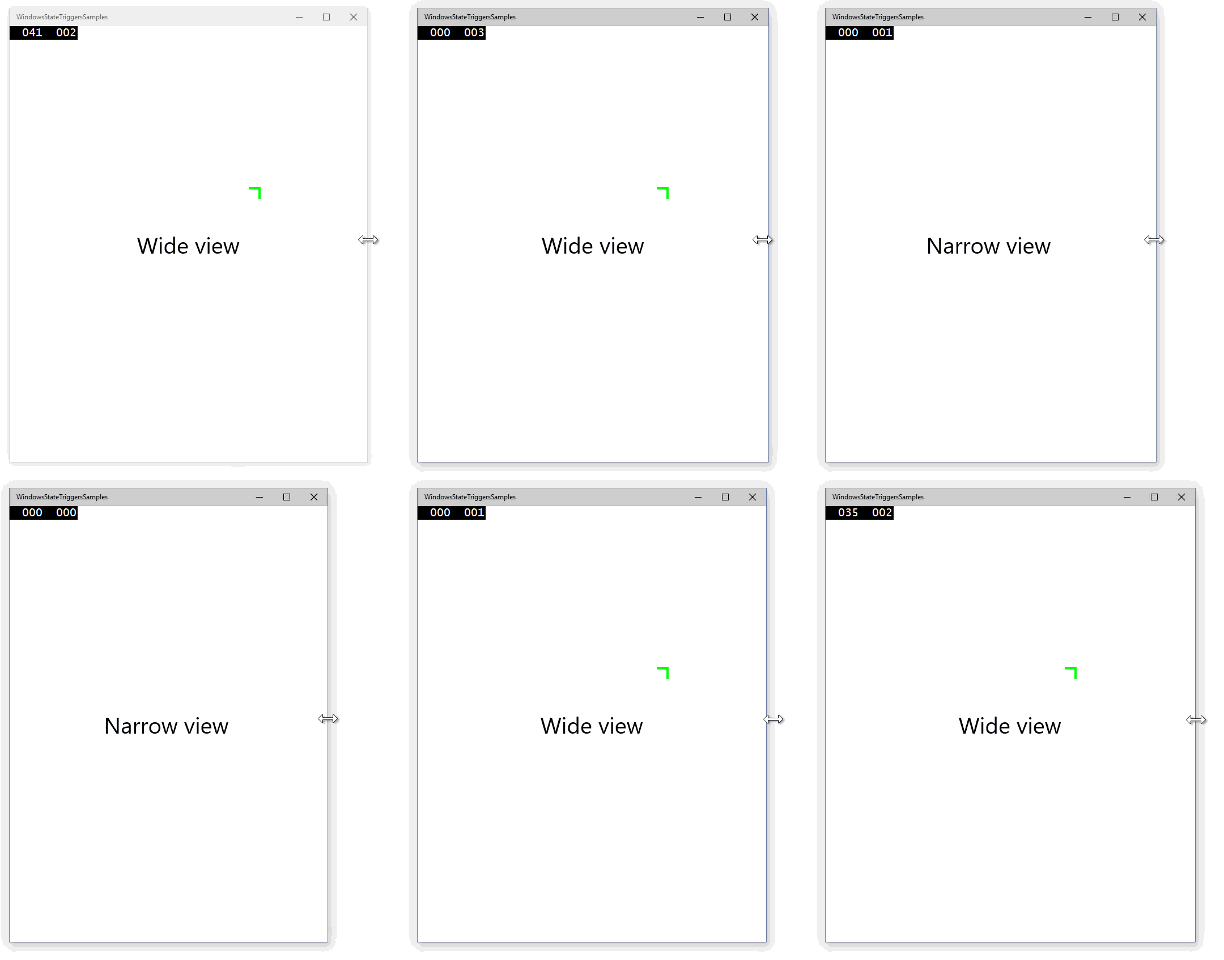
The Windows 10 Preview SDK was finally released, and we all finally get a peek at what the new Universal App Projects (UAP) are all about. It’s one binary that will run everywhere. This means that it’s also one XAML to run both on Windows and Windows Phone. But because the user experience is usually quite different you might want a different UI for it. So a new functionality was added to Visual State that allows you to easily change the layout based on the width of your window. So the idea is that the layout adapts not based on device, but by screen real-estate. Here’s what that could look like:

<Grid >
  <VisualStateManager.VisualStateGroups>
    <VisualStateGroup >
      <VisualState x:Name="narrow">
        <VisualState.StateTriggers>
          <AdaptiveTrigger MinWindowWidth="0" />
        </VisualState.StateTriggers>
        <VisualState.Setters>
          <Setter Target="status.Text" Value="Narrow view" />
        </VisualState.Setters>
      </VisualState>
      <VisualState x:Name="wide">
        <VisualState.StateTriggers>
          <AdaptiveTrigger MinWindowWidth="600" />
        </VisualState.StateTriggers>
        <VisualState.Setters>
          <Setter Target="status.Text" Value="Wide view" />
        </VisualState.Setters>
      </VisualState>
    </VisualStateGroup>
  </VisualStateManager.VisualStateGroups>
  
  <TextBlock x:Name="status" FontSize="40"
  HorizontalAlignment="Center" VerticalAlignment="Center" />
</Grid>
WideNarrowState

So the basic idea is that by using the AdaptiveTrigger, when the window gets small enough, switch to the phone/narrow UI. So on a phone it’ll probably always be this UI used. Pretty neat, and allows for a similar experience across devices, but adapt for bigger screens.

When taking a closer look at the StateTriggers property, it takes a collection of ‘StateTrigger’, which is an abstract class that AdaptiveTrigger inherits from. So it stands to reason that perhaps we can create our own state triggers?

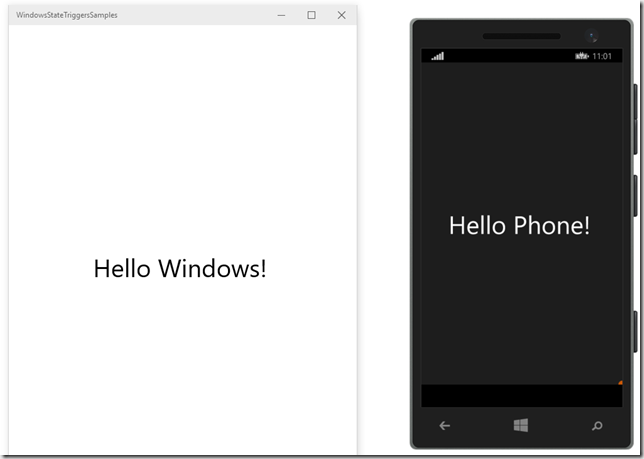
Supposed basing your UI on the width isn’t good enough, and you want to base it on the platform you’re on (Windows vs Windows Phone), we can create a new state trigger for this purpose. All we have to do is call the base method SetTriggerValue(bool) whether the conditions of the state is enabled or not. So here’s what a class like that would look like:

public class DeviceTypeAdaptiveTrigger : StateTriggerBase
{
    public DeviceType PlatformType
    {
        get { return (DeviceTypeAdaptiveTrigger.DeviceType)GetValue(DeviceTypeProperty); }
        set { SetValue(DeviceTypeProperty, value); }
    }
 
    public static readonly DependencyProperty DeviceTypeProperty =
        DependencyProperty.Register("DeviceType", typeof(DeviceType), typeof(DeviceTypeAdaptiveTrigger),
        new PropertyMetadata(DeviceType.Unknown, OnDeviceTypePropertyChanged));
 
    private static void OnDeviceTypePropertyChanged(DependencyObject d, DependencyPropertyChangedEventArgs e)
    {
        var obj = (DeviceTypeAdaptiveTrigger)d;
        var val = (DeviceType)e.NewValue;
        var qualifiers = Windows.ApplicationModel.Resources.Core.ResourceContext.GetForCurrentView().QualifierValues;
        if (qualifiers.ContainsKey("DeviceFamily") && qualifiers["DeviceFamily"] == "Mobile")
            obj.SetTriggerValue(val == DeviceType.Mobile);
        if (qualifiers.ContainsKey("DeviceFamily") && qualifiers["DeviceFamily"] == "Desktop")
            obj.SetTriggerValue(val == DeviceType.Desktop);
    }
 
    public enum DeviceType
    {
        Unknown = 0, Desktop = 1, Mobile = 2,
    }
}

And we can use this in XAML this way:

<VisualStateGroup>
    <VisualState x:Name="windows">
        <VisualState.StateTriggers>
            <triggers:DeviceTypeAdaptiveTrigger DeviceType="Desktop" />
        </VisualState.StateTriggers>
        <VisualState.Setters>
            <Setter Target="greeting.Text" Value="Hello Windows!" />
        </VisualState.Setters>
    </VisualState>
    <VisualState x:Name="phone">
        <VisualState.StateTriggers>
            <triggers:DeviceTypeAdaptiveTrigger DeviceType="Mobile" />
        </VisualState.StateTriggers>
        <VisualState.Setters>
            <Setter Target="greeting.Text" Value="Hello Phone!" />
        </VisualState.Setters>
    </VisualState>
</VisualStateGroup>
image

I’ve created a few more triggers and put them on Github. I won’t go into the code here, but you can grab the source up there. But instead here’s how we can use some of these:

OrientationStateTrigger: Adapt the UI based on the screen orientation: Portrait or Landscape

<VisualStateGroup>
    <VisualState x:Name="landscape">
        <VisualState.StateTriggers>
            <triggers:OrientationStateTrigger Orientation="Landscape" />
        </VisualState.StateTriggers>
        <VisualState.Setters>
            <Setter Target="orientationText.Text" Value="Landscape!" />
        </VisualState.Setters>
    </VisualState>
    <VisualState x:Name="portrait">
        <VisualState.StateTriggers>
            <triggers:OrientationStateTrigger Orientation="Portrait" />
        </VisualState.StateTriggers>
        <VisualState.Setters>
            <Setter Target="orientationText.Text" Value="Portrait!" />
        </VisualState.Setters>
    </VisualState>
</VisualStateGroup>

IsTypePresentStateTrigger: Enabled/disable UI based on whether a certain API is available. For instance if a hardware back button is present (usually Windows Phone), we can hide the back button from the UI, and free up some screen space.

<VisualState x:Name="backButton">
    <VisualState.StateTriggers>
        <triggers:IsTypePresentStateTrigger TypeName="Windows.Phone.UI.Input.HardwareButtons" />
    </VisualState.StateTriggers>
    <VisualState.Setters>
        <Setter Target="BackButton.Visibility" Value="Collapsed" />
    </VisualState.Setters>
</VisualState>

Now the next question is: Does these values support binding? If they do, these triggers could be the new equivalent of WPF’s DataTriggers. So let’s create a simple data trigger that turns something on, based on a boolean. We can implement a simple IsTrueStateTrigger / IsFalseStateTrigger and just call the base method if the value we bound is true or not.

<VisualState>
    <VisualState.StateTriggers>
        <triggers:IsTrueStateTrigger Value="{Binding MyBoolean}" />
    </VisualState.StateTriggers>
    <VisualState.Setters>
        <Setter Target="box.Visibility" Value="Collapsed" />
    </VisualState.Setters>
</VisualState>

Of course I could use a value converter for this as well, but this has a lot greater flexibility – a converter would have to be written to convert to Visible/Collapsed state, whereas this trigger can set any property to any value type.

Got any more ideas for useful generic state triggers? Fork and make a pull request!

https://github.com/dotMorten/WindowsStateTriggers

Big props goes to Scott Lovegrove for directing my attention to the possibility of custom state triggers