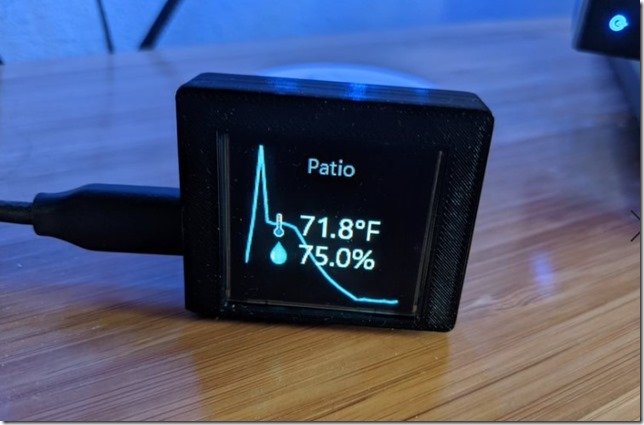
I used to have a little 8" tablet next to my PC that would run a little simple app, and show calendar for today, weather and various other info. It was a neat little thing to have to glance at, and I rarely missed a meeting etc. because I would often glance and get reminded of what's on my to-do list today. However tablets don't like to be plugged in 24/7, so ultimately it died, and I've been missing having something like this for a while.
That's where I got the idea to just plug in a little external display to my PC and have a little app run on that. However, when you plug in another display, it becomes part of your desktop, and I didn't want it to be an area where other apps could go to, or where the app that is meant to launch on it, would go somewhere else, which got me wondering: Can I plug in one of those little IoT displays I had laying around into my PC and drive it with a little bit of code?

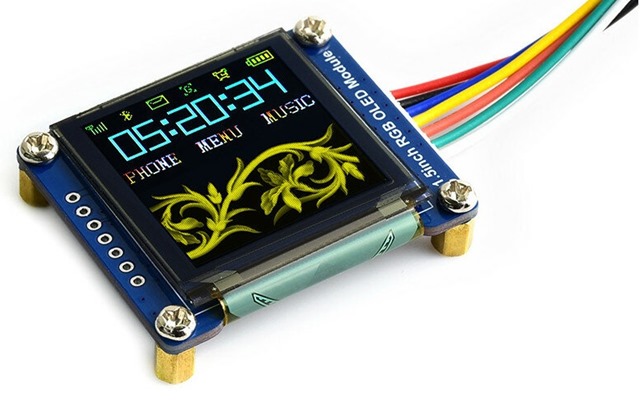
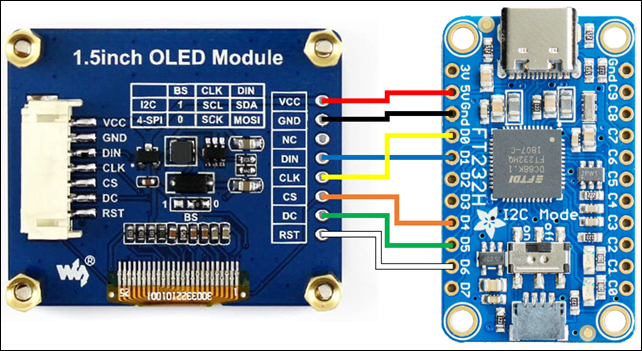
These little 1.5" OLED displays are great, and could do the job. The only problem was, this was an SPI display, and my PC doesn't have an SPI port. A bit of searching and I found Adafruit has an FT232H USB-to-SPI board that can do the trick. A quick bit of soldering, and you're good to go (see diagram wiring below): If you want to create a 3D printed case for it, you can download my models from here: https://www.thingiverse.com/thing:4935630 (it's a tight fit so keep those wires short and tight)

Now I wanted to use .NET IoT since this was the easiest for me to write against, but unfortunately it turned out this specific Adafruit SPI device isn't supported. However the IoT team is awesome, and after reaching out, they couldn't help themselves adding this support (Thank you Laurent Ellerbach who did this on his vacation!). The display module is already supported by .NET IoT, so it was mostly a matter of figuring out what code to write to hook it up correctly. Luckily there are samples there that only needed slight tweaking. So let's get to the code.
Setting up the project
First open a command prompt / terminal, and start by creating the application worker process and add some dependencies we need:
> dotnet new worker
> dotnet add package Iot.Device.Bindings
> dotnet add package Microsoft.Extensions.Hosting.WindowsServices
You'll also want to change the target framework to 'net5.0-windows10.0.19041.0' since we'll be using the Windows APIs further down.
At the time of writing this, the FT232H PR hasn't been merged yet, so download that project from here and add it as a project reference. Hopefully by the time you read this, it'll already be part of the bindings package.
Initializing the display
The thing we'll do is to create the display driver that we need, so let's add a method for that to the Worker.cs file:
private static Iot.Device.Ssd1351.Ssd1351 CreateDisplay()
{
    var devices = Iot.Device.Ft232H.Ft232HDevice.GetFt232H();
    var device = new Iot.Device.Ft232H.Ft232HDevice(devices[0]);
    var driver = device.CreateGpioDriver();
    var ftSpi = device.CreateSpiDevice(new System.Device.Spi.SpiConnectionSettings(0, 4) { Mode = System.Device.Spi.SpiMode.Mode3, DataBitLength = 8, ClockFrequency = 16_000_000 /* 16MHz */ });
    var controller = new System.Device.Gpio.GpioController(System.Device.Gpio.PinNumberingScheme.Logical, driver);
    Iot.Device.Ssd1351.Ssd1351 display = new(ftSpi, dataCommandPin: 5, resetPin: 6, gpioController: controller);
    return display;
}
Next we need to set a range of commands to the display to get it configured and "ready". We'll add another method for that here:
private static async Task InitDisplayAsync(Iot.Device.Ssd1351.Ssd1351 display)
{
    await display.ResetDisplayAsync();
    display.Unlock();
    display.MakeAccessible(); // Command A2,B1,B3,BB,BE,C1 accessible if in unlock state
    display.SetDisplayOff(); // Turn on sleep mode
    display.SetDisplayEnhancement(true);
    display.SetDisplayClockDivideRatioOscillatorFrequency(0x00, 0x0F); // 7:4 = Oscillator Frequency, 3:0 = CLK Div Ratio (A[3:0]+1 = 1..16)
    display.SetMultiplexRatio(); // Use all 128 common lines by default....
    display.SetSegmentReMapColorDepth(Iot.Device.Ssd1351.ColorDepth.ColourDepth262K,
        Iot.Device.Ssd1351.CommonSplit.OddEven, Iot.Device.Ssd1351.Seg0Common.Column0,
        Iot.Device.Ssd1351.ColorSequence.RGB); // 0x74 Color Depth = 64K, Enable COM Split Odd Even, Scan from COM[N-1] to COM0. Where N is the Multiplex ratio., Color sequence is normal: B -> G -> R
    display.SetColumnAddress(); // Columns = 0 -> 127
    display.SetRowAddress(); // Rows = 0 -> 127
    display.SetDisplayStartLine(); // set startline to to 0
    display.SetDisplayOffset(0); // Set vertical scroll by Row to 0-127.
    display.SetGpio(Iot.Device.Ssd1351.GpioMode.Disabled, Iot.Device.Ssd1351.GpioMode.Disabled); // Set all GPIO to Input disabled
    display.SetVDDSource(); // Enable internal VDD regulator
    display.SetPreChargePeriods(2, 3); // Phase 1 period of 5 DCLKS,  Phase 2 period of 3 DCLKS
    display.SetPreChargeVoltageLevel(31);
    display.SetVcomhDeselectLevel(); // 0.82 x VCC
    display.SetNormalDisplay(); // Reset to Normal Display
    display.SetContrastABC(0xC8, 0x80, 0xC8); // Contrast A = 200, B = 128, C = 200
    display.SetMasterContrast(0x0a); // No Change = 15
    display.SetVSL(); // External VSL
    display.Set3rdPreChargePeriod(0x01); // Set Second Pre-charge Period = 1 DCLKS
    display.SetDisplayOn(); //--turn on oled panel
    display.ClearScreen();
}
This should be enough to start using our panel. Let's modify the ExecuteAsync method to initialize the display and have it start drawing something:
Iot.Device.Ssd1351.Ssd1351? display;

protected override async Task ExecuteAsync(CancellationToken stoppingToken)
{
    display = CreateDisplay();
    await InitDisplayAsync(display);
    try
    {
        while (!stoppingToken.IsCancellationRequested)
        {
            display.FillRect(System.Drawing.Color.Red, 0, 0, 128, 128);
            await Task.Delay(1000, stoppingToken);
            display.FillRect(System.Drawing.Color.White, 0, 0, 128, 128);
            await Task.Delay(1000, stoppingToken);
        }
    }
    catch (OperationCanceledException)
    {
    }
    finally
    {
        display.SetDisplayOff();
    }
}
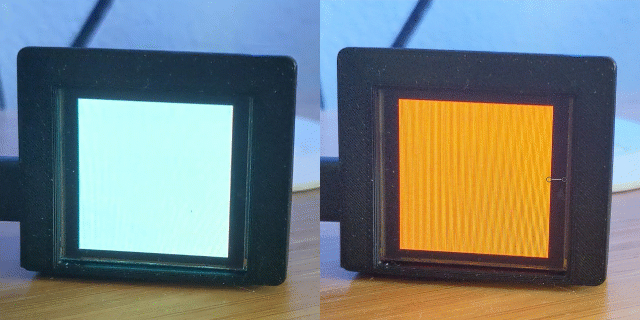
If you run your app now, you should see something like this:

If not, check your wiring.
Note that the SetDisplayOff code is quite important. If you kill the app before that code executes, you'll notice that the display will be stuck on whatever last screen you were showing. This isn't good for OLEDs, as it can cause burn-in over time. This also happens if your PC goes into standby, so it's a good idea to turn the display off when standby occurs. It's also a good idea to ensure the display is turned off in the event of an exception, so it's good to have that code in a finally statement.
To detect standby, add a reference to the Windows SDKs by setting <UseWindowsForms>true</UseWindowsForms> in your project's PropertyGroup and it'll bring in the required reference. Then add the following code:
Microsoft.Win32.SystemEvents.PowerModeChanged += (s, e) =>
{
    if (e.Mode == Microsoft.Win32.PowerModes.Suspend)
        display?.SetDisplayOff();
    else if (e.Mode == Microsoft.Win32.PowerModes.Resume)
        display?.SetDisplayOn();
}
At this point, we're pretty much all set to make this little display more useful.
Drawing to the display
Let's create a bit of code that writes a message to the screen. We can just use its System.Drawing APIs to draw a bitmap and send it to the device. Let's create a small helper method first to do that:
private void DrawImage(Action<System.Drawing.Graphics, int, int> drawAction)
{
    using System.Drawing.Bitmap dotnetBM = new(128, 128);
    using var g = System.Drawing.Graphics.FromImage(dotnetBM);
    g.Clear(System.Drawing.Color.Black);
    drawAction(g, 128, 128);
    dotnetBM.RotateFlip(System.Drawing.RotateFlipType.RotateNoneFlipX);
    display.SendBitmap(dotnetBM);
}
Note that we flip the image before sending it, so the display gets the pixels in the right expected order. Next lets modify our little drawing loop, to draw something instead:
DrawImage((g, w, h) =>
{
    g.DrawString("Hello World", new System.Drawing.Font("Arial", 12), System.Drawing.Brushes.White, new System.Drawing.PointF(0, h / 2 - 6));
});
await Task.Delay(1000, stoppingToken);
DrawImage((g, w, h) =>
{
    g.DrawString(DateTime.Now.ToString("HH:mm"), new System.Drawing.Font("Arial", 12), System.Drawing.Brushes.White, new System.Drawing.PointF(0, h / 2 - 6));
});
await Task.Delay(1000, stoppingToken);
You should now see the display flipping between showing "Hello World" and the current time of day. You can use any of the drawing APIs to draw graphics, bitmaps etc. For instance I have the worker process monitor my doorbell and cameras, and if there's a motion or doorbell event, it'll start sending snapshots from the camera to the display, and after a short while, switch back to the normal loop of pages.
Drawing a calendar
Let's make the display a little more useful. Since we can access the WinRT Calendar APIs from our .NET 5 Windows app, we can get the calendar appointments from the system. So let's create a little helper method to get, monitor and draw the calendar:
private Windows.ApplicationModel.Appointments.AppointmentStore? store;
private System.Collections.Generic.IList<Windows.ApplicationModel.Appointments.Appointment> events =
    new System.Collections.Generic.List<Windows.ApplicationModel.Appointments.Appointment>();

private async Task LoadCalendar()
{
    store = await Windows.ApplicationModel.Appointments.AppointmentManager.RequestStoreAsync(Windows.ApplicationModel.Appointments.AppointmentStoreAccessType.AllCalendarsReadOnly);
    await LoadAppointments();
    store.StoreChanged += (s, e) => LoadAppointments();
}
private async Task LoadAppointments()
{
    if (store is null)
        return;
    var ap = await store.FindAppointmentsAsync(DateTime.Now.Date, TimeSpan.FromDays(90));
    events = ap.Where(a => !a.IsCanceledMeeting).OrderBy(a => a.StartTime).ToList();
}

private void DrawCalendar(System.Drawing.Graphics g, int width, int height)
{
    float y = 0;
    var titleFont = new System.Drawing.Font("Arial", 12);
    var subtitleFont = new System.Drawing.Font("Arial", 10);
    float lineSpacing = 5;
    foreach (var a in events)
    {
        var time = a.StartTime.ToLocalTime();
        if (time + a.Duration < DateTimeOffset.Now)
        {
            _ = LoadAppointments();
            continue;
        }
        string timeString = a.AllDay ? time.ToString("d") : time.ToString();
        if (time < DateTimeOffset.Now.Date.AddDays(1)) //Within 24 hours
        {
            if (a.AllDay) timeString = time.Date <= DateTimeOffset.Now.Date ? "Today" : "Tomorrow";
            else timeString = time.ToString("HH:mm");
        }
        else if (time < DateTimeOffset.Now.AddDays(7)) // Add day of week
        {
            if (a.AllDay) timeString = time.ToString("ddd");
            else timeString = time.ToString("ddd HH:mm");
        }
        if (!a.AllDay && a.Duration.TotalMinutes >= 2) // End time
        {
            timeString += " - " + time.Add(a.Duration).ToString("HH:mm");
        }
        var color = System.Drawing.Brushes.White;
        if (!a.AllDay && a.StartTime <= DateTimeOffset.UtcNow && a.StartTime + a.Duration > DateTimeOffset.UtcNow)
            color = System.Drawing.Brushes.Green; // Active meetings are green
        g.DrawString(a.Subject, titleFont, color, new System.Drawing.PointF(0, y));
        y += titleFont.Size + lineSpacing;
        g.DrawString(timeString, subtitleFont, System.Drawing.Brushes.Gray, new System.Drawing.PointF(2, y));
        y += subtitleFont.Size + lineSpacing;
        if (y > height)
            break;
    }
}
Most of the code should be pretty self-explanatory, and most of just deals with writing a pretty time stamp for each appointment. Replace the bit of code that draws "Hello World" with this single one line:
DrawImage(DrawCalendar);
And you should now see your display alternating between time of day, and you upcoming calendar appointments.
Conclusion
As you can tell, once the display and code is hooked up, it's pretty easy to start adding various cycling screens to your display, and you can add anything you'd like that fits your needs.
I'm using my Unifi client library to listen for camera and doorbell events and display camera motions, I connect to home assistant's REST API to get current temperature outside and draw a graph, so I know if weather is still heating up, or cooling down, and whether I should close or open the windows to save on AC. I have a smart meter, so I show current power consumption, which helps me be more aware of trying to save energy, and when a meeting is about to start, I start flashing the display with a count down (I'm WAY better now at joining meetings on time). There are lots and lots more options you could do, and I'd love to hear your ideas what this could be used for. I do hope in the long run, this could evolve into a configurable application with lots of customization and plugins, as well as varying display size.
On my list next is to use a 2.4" LED touch screen instead, to add a bit more space for stuff, as well as the ability to interact with the display directly.
Parts List
- WaveShare 1.5" OLED
- Adafruit has an FT232H USB-to-SPI board
Source code
Just want all the source code for this? Download it here