Create Universal Map App In Under 2 Minutes

We just released the second beta drop of the 'ArcGIS Runtime for .NET SDK', which now supports both Windows Store 8.1, Windows Phone 8.1 in addition to WPF. This means you can now build universal apps with a map control that supports all these platforms. We also released the package on NuGet for your convenience.

As a demonstration how quick it is to create a Windows Phone and Windows Store app, here's a little video creating a universal map app from scratch in 80 seconds:


Note: The nuget package currently doesn't support WPF. You will need to download the full setup to get WPF support as well, instead of using the nuget version.

The layout of an ExtensionSDK

Extension SDKs are a very powerful way distribute your control libraries for use in Windows Store and Windows Phone apps.
This article will go through the layout of the extension sdk, and later take that knowledge to build an extension sdk from an already released app.

An ExtensionSDK essentially consists of 3 parts:

  • Files to use during design time
  • Files to deploy as content
  • Assemblies to use for reference

In addition there's a metadata file 'SDKManifest.xml' that describes the content.

The root layout then looks like the following:
    \EXTENSIONNAME\VERSION\DesignTime\
    \EXTENSIONNAME\VERSION\Redist\
    \EXTENSIONNAME\VERSION\References\
    \EXTENSIONNAME\VERSION\SDKManifest.xml
…where 'EXTENSIONAME' is the name of your extension, and VERSION is version number in the format "1.2.3.4".
   
For each of these groups you can control what gets deployed in debug and release or both. If you don't want to control whether you use debug or release, you will below these folders use the folder 'CommonConfiguration'. For debug specific configuration use 'Debug', and for release configuration use 'Retail'. In most case you will be using 'CommonConfiguration' though.
This means our folder structure now looks like this:
    \EXTENSIONNAME\VERSION\DesignTime\CommonConfiguration\
    \EXTENSIONNAME\VERSION\Redist\CommonConfiguration\
    \EXTENSIONNAME\VERSION\References\CommonConfiguration\

Next level down in the folders describe if files are related to AnyCPU, x86, x64 or ARM builds (the latter is very useful for C++ projects). For AnyCPU use 'neutral', meaning it doesn't matter. So use this for .NET Assemblies compiled for AnyCPU, image resources, winmd files etc. You will want to use the architecture specific folder if you deploy binaries that are architecture specific.

So what goes in what folders:

  • DesignTime: This is where you will put .Design assemblies if you have specific design time binaries for your assemblies, as well as Generic.xaml. You only need to deploy 'neutral' and/or 'x86' architectures, since VS runs in a 32bit process.
  • Redist: Images, shaders, Generic.xbf, videos etc, AND C++ binaries.
  • References: .NET DLLs, C++ WinMDs, xml doc.

Here's an example layout of an extension sdk that consists of two libraries: One C++ WinRT component (NativeLib) and a Managed library:
    \MyControlLib\1.0.0.0\SDKManifest.xml
    \MyControlLib\1.0.0.0\DesignTime\CommonConfiguration\neutral\ManagedLib\Themes\Generic.xaml
    \MyControlLib\1.0.0.0\DesignTime\CommonConfiguration\x86\ManagedLib.Design.dll
    \MyControlLib\1.0.0.0\Redist\CommonConfiguration\neutral\ManagedLib.pri
    \MyControlLib\1.0.0.0\Redist\CommonConfiguration\neutral\NativeLib.pri
    \MyControlLib\1.0.0.0\Redist\CommonConfiguration\neutral\ManagedLib\Icon.png
    \MyControlLib\1.0.0.0\Redist\CommonConfiguration\neutral\ManagedLib\Themes\Generic.xbf
    \MyControlLib\1.0.0.0\Redist\CommonConfiguration\neutral\NativeLib\shaders\PixelShader.cso
    \MyControlLib\1.0.0.0\Redist\CommonConfiguration\neutral\NativeLib\shaders\VertexShader.cso
    \MyControlLib\1.0.0.0\Redist\CommonConfiguration\ARM\NativeLib.dll
    \MyControlLib\1.0.0.0\Redist\CommonConfiguration\x86\NativeLib.dll
    \MyControlLib\1.0.0.0\Redist\CommonConfiguration\x64\NativeLib.dll
    \MyControlLib\1.0.0.0\References\CommonConfiguration\neutral\NativeLib.winmd
    \MyControlLib\1.0.0.0\References\CommonConfiguration\ARM\ManagedLib.dll
    \MyControlLib\1.0.0.0\References\CommonConfiguration\ARM\ManagedLib.xml
    \MyControlLib\1.0.0.0\References\CommonConfiguration\x64\ManagedLib.dll
    \MyControlLib\1.0.0.0\References\CommonConfiguration\x64\ManagedLib.xml
    \MyControlLib\1.0.0.0\References\CommonConfiguration\x86\ManagedLib.dll
    \MyControlLib\1.0.0.0\References\CommonConfiguration\x86\ManagedLib.xml

The SDKManifest could look like the following:

    <?xml version="1.0" encoding="utf-8" ?>
    <FileList
      xmlns:xsi="
http://www.w3.org/2001/XMLSchema-instance"
      xsi:noNamespaceSchemaLocation="SDKManifest.xsd"
      DisplayName="My Super Duper Control Library"
      ProductFamilyName="MyControlLib"
      Description="My Control Library"
      MinVSVersion="12.0"
      Identity="MyControlLib, Version=1.0.0.0"
      MinToolsVersion="12.0"
      AppliesTo="WindowsAppContainer + ( Managed )"
      SupportedArchitectures="x86;x64;ARM"
      DependsOn="Microsoft.VCLibs, version=12.0"
      SupportsMultipleVersions="Error">
        <File Reference="NativeLib.winmd" Implementation="NativeLib.dll" />
        <File Reference="ManagedLib.dll"/>
    </FileList>

   
Note that if you don't have native dependencies, this would change quite a lot. The full set of properties are pretty poorly documented today, so generally I download and install a wealth of extension sdks and look at them and see if they do similar things to me and then copy from that.

Building an Extension SDK from an installed app

So now that we know the layout of an extension sdk, let us apply that to 'reverse-engineering' an already deployed app into an extension sdk and use that to build our own app on top. Because Windows Store apps aren't fully encrypted, this means you can often take parts of an app that's separated out into libraries and build a new app from these libraries. This is something to consider when you build your app - if you are really good are separating your stuff into sub-libraries, you also make it easier for others to reuse your stuff. As an example let's download the Bing Maps Preview app and reverse it into an SDK and build our own 3D Map App.

When you installed the app, you will be able to access a folder with a name similar to the following with administrator rights:
"c:\Program Files\WindowsApps\Microsoft.Maps3DPreview_2.1.2326.2333_x64__8wekyb3d8bbwe\"

In here we'll find a lot of logic for the app, but the main one we are interested in is the "Bing.Maps" folder and the Bing.Maps dll+winmd. The folder is essentially the content and is image resources and shaders. The Bing Maps.dll and Winmd are C++ WinRT components. Since the dll is C++, the architecture will either be ARM, x86 or x64 depending on what PC you downloaded it on. In my case it's x64 so I should be able to build an extension sdk that will support 64 bit PCs from this alone. If I want to support more, I will have to install the app on a x86 or ARM PC and copy the dll from there as well (the other files are neutral and will be the same).

So let's first create the following folder : "Bing.Maps\1.0.0.0\".

Next, let's copy the "Bing.Maps" folder that has all the images and shaders into
    \Bing.Maps\1.0.0.0\Redist\CommonConfiguration\neutral\Bing.Maps\
Next copy the Bing.Maps.dll into (x64 if that's what you have, change/add ARM/x86 if your binary isn't x64)
    \Bing.Maps\1.0.0.0\Redist\CommonConfiguration\x64\Bing.Maps.dll
Lastly, copy the Bing.Maps.winmd into:
    \Bing.Maps\1.0.0.0\References\CommonConfiguration\neutral\Bing.Maps.winmd

Lastly we need to create a new file in \Bing.Maps\1.0.0.0\SDKManifest.xml to describe the SDK:

    <?xml version="1.0" encoding="utf-8" ?>
    <FileList
      xmlns:xsi="
http://www.w3.org/2001/XMLSchema-instance"
      xsi:noNamespaceSchemaLocation="SDKManifest.xsd"
      DisplayName="Bing Maps"
      ProductFamilyName="Bing.Maps"
      MinVSVersion="12.0"
      Identity="Bing.Maps, Version=1.0.0.0"
      MinToolsVersion="12.0"
      AppliesTo="WindowsAppContainer"
      SupportedArchitectures="x86;x64;ARM"
      DependsOn="Microsoft.VCLibs, version=12.0"
      SupportsMultipleVersions="Error">
        <File Reference="Bing.Maps.winmd" Implementation="Bing.Maps.dll" />
    </FileList>

Voila! We now have an ExtensionSDK. There's several ways you can 'install' this into Visual Studio. The simplest way is to copy the folder into your user folder under %USERPROFILE%\AppData\Local\Microsoft SDKs\<target platform>\v<platform version number>\ExtensionSDKs.
In this case %USERPROFILE%\AppData\Local\Microsoft SDKs\Windows\v8.1\ExtensionSDKs\

If you're building an installer you can also install it into
    %Program Files%\Microsoft SDKs\Windows\v8.1\ExtensionSDKs
Or specify a link to the location of the folder in a registry key:
    HKLM\Software\Microsoft\Microsoft SDKs\Windows\v8.1\ExtensionSDKs\Bing.Maps\1.0.0.0\

Lastly you can do this in your project file    by using the 'SDKReferenceDirectoryRoot' tag. Add the following right before the <Target Name="BeforeBuild"/> tag at the very bottom.

  <PropertyGroup>
    <SDKReferenceDirectoryRoot>c:\myfolder\my_sdks\;$(SDKReferenceDirectoryRoot)</SDKReferenceDirectoryRoot>
  </PropertyGroup>

Note that for the latter, the folder should point to a root extension sdk folder, meaning the SDK above must be located in a certain tree under this folder. In this case:
    c:\myfolder\my_sdks\Windows\v8.1\ExtensionSDKs\Bing.Maps

When you've done any of these install options, you can now get started building an app. Go to "Add References" and the Bing Maps entry should show up.

image

Now add the following XAML to your page:

        <bing:Map x:Name="map" xmlns:bing="using:Bing.Maps">
            <bing:Map.MapProjection>
                <bing:ThreeDimensionalMapProjection />
            </bing:Map.MapProjection>
        </bing:Map>

And in code-behind after "InitializeComponents":

            map.BaseLayers = Bing.Maps.BaseLayers.CreatePhotoRealisticOverlay();

Run the app and you should see a 3D globe!

image

Note: This Bing Maps SDK is not based on anything officially released but on a un-finished app. This is by all means a giant hack and only meant as an exercise to build an Extension SDK. Use this at your own risk and don’t attempt to publish any apps using it.

References:

Decoding the IXamlMetadataProvider interface - Part 1

The WinRT XAML SDK holds a big secret. It’s even a secret why it’s a secret. But you’ll see several of forum posts with Microsoft staff hinting at this secret, but not following up with actual examples or sufficient documentation.

So what is this secret? Well let’s start with good old WPF, Silverlight and what else is dead. One of the issues with these frameworks has been performance, and one of the performance issues was converting XAML into running code at runtime. This requires a lot of reflection and was part of the performance problem. WinRT attempts to solve this by taking this hit during compile time. It basically generates metadata about the classes you use, and thereby avoids the reflection overhead. At first glance this is pretty clever but as I’ll show later can also have some major issues that require a lot of code using hardly documented interfaces to resolve.

This is my attempt to decode some of these interfaces. I’m not fully understanding all the bits myself yet, so this blogpost is partly to share what I found, but also my process for better understanding it.

So back to the big secret: IXamlMetadataProvider. This is the main interface that drives this type resolving at runtime, and for the most part this is done for you, and this is also where our journey will start, because we can take a peek at that work. Open any of your Windows Store XAML apps projects, turn on the “show all files”, and open up the secret \obj\[Config]\XamlTypeInfo.g.cs file.

image

The code will look something like this in the top:

image

Keep scrolling a bit down, and you’ll start seeing some string-based typename lookups, including the types you use in your app:

image

Now let’s try and create a new class and see what happens to this file. Let’s add the following class:

public class StringCollection : ObservableCollection<string> { } 

Rebuild, and check the auto generated file. You’ll notice that this class does not show up. This is because it’s not used in XAML or by anything else that is used in XAML. Next try declaring this collection as a resource in XAML:

<Grid.Resources>
    <local:StringCollection x:Key="coll" />
</Grid.Resources>

Let’s jump back and look at the CreateXamlType method that magically  just got updated with a whole lot of more code:

private Windows.UI.Xaml.Markup.IXamlType CreateXamlType(string typeName)
{
    XamlMetadataSample.XamlMetadataSample_XamlTypeInfo.XamlSystemBaseType xamlType = null;
    XamlMetadataSample.XamlMetadataSample_XamlTypeInfo.XamlUserType userType;

    switch (typeName)
    {
    case "Object":
        xamlType = new XamlMetadataSample.XamlMetadataSample_XamlTypeInfo.XamlSystemBaseType(typeName, typeof(object));
        break;

    case "String":
        xamlType = new XamlMetadataSample.XamlMetadataSample_XamlTypeInfo.XamlSystemBaseType(typeName, typeof(string));
        break;

    case "Int32":
        xamlType = new XamlMetadataSample.XamlMetadataSample_XamlTypeInfo.XamlSystemBaseType(typeName, typeof(int));
        break;

    case "Windows.UI.Xaml.Controls.Page":
        xamlType = new XamlMetadataSample.XamlMetadataSample_XamlTypeInfo.XamlSystemBaseType(typeName, typeof(Windows.UI.Xaml.Controls.Page));
        break;

    case "Windows.UI.Xaml.Controls.UserControl":
        xamlType = new XamlMetadataSample.XamlMetadataSample_XamlTypeInfo.XamlSystemBaseType(typeName, typeof(Windows.UI.Xaml.Controls.UserControl));
        break;

    case "XamlMetadataSample.StringCollection":
        userType = new XamlMetadataSample.XamlMetadataSample_XamlTypeInfo.XamlUserType(this, typeName, typeof(XamlMetadataSample.StringCollection), GetXamlTypeByName("System.Collections.ObjectModel.ObservableCollection<String>"));
        userType.Activator = Activate_0_StringCollection;
        userType.CollectionAdd = VectorAdd_0_StringCollection;
        xamlType = userType;
        break;

    case "System.Collections.ObjectModel.ObservableCollection<String>":
        userType = new XamlMetadataSample.XamlMetadataSample_XamlTypeInfo.XamlUserType(this, typeName, typeof(ObservableCollection<string>), GetXamlTypeByName("System.Collections.ObjectModel.Collection<String>"));
        AddToMapOfTypeToStandardName(typeof(ObservableCollection<string>),
                                            "System.Collections.ObjectModel.ObservableCollection<String>");
        userType.Activator = Activate_1_ObservableCollection;
        userType.CollectionAdd = VectorAdd_1_ObservableCollection;
        xamlType = userType;
        break;

    case "System.Collections.ObjectModel.Collection<String>":
        userType = new XamlMetadataSample.XamlMetadataSample_XamlTypeInfo.XamlUserType(this, typeName, typeof(Collection<string>), GetXamlTypeByName("Object"));
        AddToMapOfTypeToStandardName(typeof(Collection<string>),
                                            "System.Collections.ObjectModel.Collection<String>");
        userType.Activator = Activate_2_Collection;
        userType.CollectionAdd = VectorAdd_2_Collection;
        userType.AddMemberName("Count");
        AddToMapOfTypeToStandardName(typeof(int),
                                            "Int32");
        xamlType = userType;
        break;

    case "XamlMetadataSample.MainPage":
        userType = new XamlMetadataSample.XamlMetadataSample_XamlTypeInfo.XamlUserType(this, typeName, typeof(XamlMetadataSample.MainPage), GetXamlTypeByName("Windows.UI.Xaml.Controls.Page"));
        userType.Activator = Activate_3_MainPage;
        xamlType = userType;
        break;

    }
    return xamlType;
}

What just happened? The compiler detected that you want to use your StringCollection class, so it creates type resolvers for this, and ANYTHING else it depends on, including base classes and types for all their properties which is why  you also see string, int, object etc show up.

Now let’s try something else. Remove the resource we added, and instead add the following property to MainPage.xaml.cs

public StringCollection MyCollection { get; set; }

CreateXamlType doesn’t change, but instead take a look at CreateXamlMember that changes from this:

private IXamlMember CreateXamlMember(string longMemberName)
{
    XamlMetadataSample.XamlMetadataSample_XamlTypeInfo.XamlMember xamlMember = null;
    // No Local Properties
    return xamlMember;
}

to this:

private IXamlMember CreateXamlMember(string longMemberName)
{
    XamlMetadataSample.XamlMetadataSample_XamlTypeInfo.XamlMember xamlMember = null;
    XamlMetadataSample.XamlMetadataSample_XamlTypeInfo.XamlUserType userType;

    switch (longMemberName)
    {
    case "XamlMetadataSample.MainPage.MyCollection":
        userType = (XamlMetadataSample.XamlMetadataSample_XamlTypeInfo.XamlUserType)GetXamlTypeByName("XamlMetadataSample.MainPage");
        xamlMember = new XamlMetadataSample.XamlMetadataSample_XamlTypeInfo.XamlMember(this, "MyCollection", "XamlMetadataSample.StringCollection");
        xamlMember.Getter = get_0_MainPage_MyCollection;
        xamlMember.Setter = set_0_MainPage_MyCollection;
        break;
    }
    return xamlMember;
}

So because our MainPage control now has a new property, this gets reflected by the auto-generated code.

What about 3rd party control libraries then? How do these get included? Well let’s take a look. First create a new Windows Store Class Library, and add a new “MyCustomControl” templated control to it. You’ll note that this new project will have its own auto-generated magic code in it’s obj folder and that works just the same way as explained on top. Basically anything you use in your Themes\Generic.xaml or any other XAML file is getting code generated for it. No surprises there. But let’s add a reference to this project to our test project, and see what will happen to the apps’s XamlTypeInfo.g.cs file. Suddenly a new property “XamlTypeInfoProvider.OtherProviders” is added:

private List<IXamlMetadataProvider> OtherProviders
{
    get
    {
        if(_otherProviders == null)
        {
            _otherProviders = new List<IXamlMetadataProvider>();
            IXamlMetadataProvider provider;
            provider = new MyControlLibrary.MyControlLibrary_XamlTypeInfo.XamlMetaDataProvider() as IXamlMetadataProvider;
            _otherProviders.Add(provider); 
        }
        return _otherProviders;
    }
}

So your app’s metadata provider automatically “merges” other project’s providers in this autogenerated code. Just for fun, let’s try and create a new class that implements IXamlMetadataProvider and add to our controls library, and see what happens:

public class MyCustomMetadataProvider : IXamlMetadataProvider
{
    public IXamlType GetXamlType(string fullName)
    {
        throw new NotImplementedException();
    }

    public IXamlType GetXamlType(Type type)
    {
        throw new NotImplementedException();
    }

    public XmlnsDefinition[] GetXmlnsDefinitions()
    {
        throw new NotImplementedException();
    }
}

And the OtherProviders property now suddenly looks like this:

private List<IXamlMetadataProvider> OtherProviders
{
    get
    {
        if(_otherProviders == null)
        {
            _otherProviders = new List<IXamlMetadataProvider>();
            IXamlMetadataProvider provider;
            provider = new MyControlLibrary.MyCustomMetadataProvider() as IXamlMetadataProvider;
            _otherProviders.Add(provider); 
            provider = new MyControlLibrary.MyControlLibrary_XamlTypeInfo.XamlMetaDataProvider() as IXamlMetadataProvider;
            _otherProviders.Add(provider); 
        }
        return _otherProviders;
    }
}

So the auto-generated code automatically detected that my custom library has a second metadata provider embedded, and injects it into this list as well as the auto-generated one. So it looks like we should be able to provide our own implementations, which I’ll get back to later.

So what have we found so far? That all types that’s being used directly or indirectly in XAML is getting type information generated, and properties on controls are getting metadata generated for those. Great you might think, but why would you need to know about this? Well the devil is in the details. Let me repeat the first finding again:

“All types that’s being used directly or indirectly in XAML is getting type information generated”

But what if I’m not using a type at compile time but only at runtime?” you might ask. That’s an excellent question and this is actually very likely to happen if your ViewModel or Model returns a type not used anywhere directly or indirectly in XAML to begin with, or if you were to use the XamlReader to parse XAML at runtime. This is also where Windows Store Xaml development starts to get really tricky very fast, and while there’s a way around this, it’s definitely not a straightforward one. And I’ll leave you hanging here to ponder on that, while I get working on Part 2 of this blogpost where I’ll get back to the custom IXamlMetadataProviders…

Building A Powerful Platform for Windows Store Mapping apps

When Microsoft announced WinRT at the Build conference in Anaheim, I instantly started researching and prototyping what this new platform could mean for the company I’m working for. The promise of integrating legacy native code with XAML and .NET seemed to finally be the exactly what I’ve been looking for. Also the tight integration between XAML and DirectX, something which is really complex to get working in WPF was intriguing, since we were often hitting the limit of what XAML could do.

We have a huge amount of native code that does a lot of advanced spatial analysis, advanced map rendering, spatial databases, etc. Even better was that most of it is written in a cross-platform way using C++ and was already running on Windows Classic, Linux, iOS, Android and several other platforms.

In hindsight I’m really amazed how quickly this work can go. Granted a lot of time was spent on researching, prototyping, ‘socializing the idea’ etc, but after we had the bases right, we were actually able to move very fast, and in less than 3 months create a whole new SDK geared for the Windows Store (albeit beta).

The things that made this go so fast was:

  1. We had lots of C++ code that was already written to be compiled cross-platform, so most of the development time was spent on exposing this via the WinRT interface and C++/CX.
  2. We chose to build a hybrid SDK based on both C++ and C#. This enabled us to port large amount of our existing C# code from our WPF and Silverlight SDKs. It also allowed us to not be limited by the inheritance limitations that WinRT has by simply creating .NET class libraries rather than WinRT class libraries, which in turn greatly simplifies the API for other developers.

Things that set us back:

  1. Our rendering engine only supported DirectX 9 and OpenGL. Windows Store apps require DirectX 11, which is quite different from v9, so a lot of work had to be done there, because we wanted to do it in a way that wasn’t being hurt by the least common denominator (ie. if DX11 supports a feature that DX9 or OpenGL doesn’t, it shouldn’t hold us back from using it). In the end, our map rendering engine became better because of it for all the platforms.
  2. The documentation on SurfaceImageSource (the glue behind DirectX and XAML) was very limited.
  3. Some time was spent on making sure the native code passes certification, although not too bad.

Several people both within the company, from Microsoft, MVPs etc has been extremely helpful getting us through those setbacks. Thank you! You know who you are (and yes I owe you beer :-)

So enough about that. Instead, I would really encourage you to go download our SDK. It’s actually free! Just go to our developers siteand hit the download button. You’ll be required to register/sign in – don’t worry – as far as I know we don’t spam :-)

Grab the download, install it, and create a new C# or VB.NET Windows Store app. Add a reference to the ArcGIS Runtime SDKs, set the build target to x86, x64 or ARM (AnyCPU won’t work since this has cool C++ code in its guts).

image

And now code away. There’s a few samples on how to get started with the API as well as a library reference on the developers site.  We know the documentation is a little slim at this point – we’re hard at work improving that. However we do have a getting started tutorial here: http://developers.arcgis.com/en/windows-store/guide/add-a-map-to-your-app.htm

In addition we have a set of samples in the form of a sample browser available today on GitHub: https://github.com/Esri/arcgis-samples-winstore

There’s also a toolkit with some controls here that you are encouraged to fork and contribute to: https://github.com/Esri/arcgis-toolkit-winstore

I did a short introduction to the API at our plenary about 4 mins into this video:

You can download the source code for the sample I built on stage on my github account here: https://github.com/dotMorten/WinStore-Routing-Sample

Go download and code away today, and ask questions and give us feedback in the forum.

Also please go read the official SDK release announcement here: http://blogs.esri.com/esri/arcgis/2013/03/25/arcgis-runtime-sdk-for-windows-store-apps-beta-is-available/

Shortcut Key Handling in Windows Store Apps

I wanted to create a simple ALT+S shortcut in my app to jump to a TextBox in my Windows Store App (no this is not the Win+Q search charm shortcut). However, this is not that obvious to get working app-wide, so I’ll share it here:

The obvious way to do this is assign a KeyDown event to your page using the typical “this.KeyDown += MyKeyDownHandler”, or override OnKeyDown. However this has one problem: If any control that has focus currently handles key down events (like TextBox), this event won’t be raised due to how event bubbling works. However there is another way to create an event handler that overrides the bubbling: UIElement.AddHandler. In the 3rd parameter of that, you can specify that you want to be notified even if the event has been handled. Here’s what that looks like for listening to the event app-wide:

Window.Current.Content.AddHandler(UIElement.KeyDownEvent, new KeyEventHandler(App_KeyDown), true);
//...
private void App_KeyDown(object sender, KeyRoutedEventArgs e)
{
     //Handle Key Down
}

If you attach to Window.Current.Content, be sure to detach again in OnNavigatingFrom, or you’ll risk having a memory leak, and also still get events firing in that page when it’s not loaded any longer. If you just want this within the page, use myPage.AddHandler of Window.Current.Content.AddHandler, but beware that if anything outside this page has focus the event won’t be raised. – at least in that case you don’t need to worry about unhooking again though.

Now second is to handle the key combination. You can check the menu/alt key status using the following line of code:

bool isMenuKeyDown = CoreWindow.GetForCurrentThread().GetAsyncKeyState(VirtualKey.Menu) == CoreVirtualKeyStates.Down;

So the obvious handler code would look like this:

private void App_KeyDown(object sender, KeyRoutedEventArgs e)
{
    if (e.Key == Windows.System.VirtualKey.S)
    {
        if(CoreWindow.GetForCurrentThread().GetAsyncKeyState(VirtualKey.Menu) == CoreVirtualKeyStates.Down)
        {
            //Handle key combination… 
} } }

Turns out the above code only works every other time. When reading the documentation on GetAsyncKeyState it states that “Determines whether a key is up or down at the time the function is called, and whether the key was pressed after a previous call to GetAsyncKeyState.

So basically this method changes its result based on whether it was called before, and not solely whether the key is down or not. This makes no sense to me why it was designed like this (but do feel free to explain in the comments if you know).

Anyway, if we just make sure this method is always called in the handler it now starts working predictably. So here’s my snippet that ckecks if ALT+S is pressed, sets focus on my textbox and selects all the text:

private void App_KeyDown(object sender, KeyRoutedEventArgs e)
{
    bool isMenuKey = CoreWindow.GetForCurrentThread().GetAsyncKeyState(Windows.System.VirtualKey.Menu) == CoreVirtualKeyStates.Down;
    if (isMenuKey && e.Key == VirtualKey.S)
    {
        queryTextBox.Focus(FocusState.Keyboard);
        queryTextBox.SelectAll();
    }
}

Rotating Elements in XAML While Maintaining Proper Flow

I recently had to lay out some text vertically stacked on top of each other in Windows 8, similar to how tabs in Visual Studio are laid out.
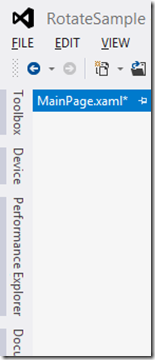
image

The obvious way to do that would be to first place the texts in a stack panel, and then rotate them like so:

<StackPanel>
    <TextBlock Text="Text 1">
        <TextBlock.RenderTransform>
            <RotateTransform Angle="90" />
        </TextBlock.RenderTransform>
    </TextBlock>
    <TextBlock Text="Text 2">
        <TextBlock.RenderTransform>
            <RotateTransform Angle="90" />
        </TextBlock.RenderTransform>
    </TextBlock>
    <TextBlock Text="Text 3">
        <TextBlock.RenderTransform>
            <RotateTransform Angle="90" />
        </TextBlock.RenderTransform>
    </TextBlock>
</StackPanel>

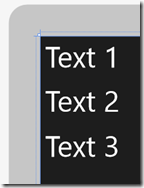
This is what it looks like without the RotateTransform:
image

And after adding rotation:

image

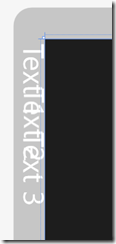
Notice how the text is now outside the containing StackPanel, and overlapping each other? So what happened? The problem is that RenderTransform is applied AFTER the layout cycle occurs so StackPanel has no way of placing these elements, since it already did it’s job prior to rotating the text. We’ll get back to how to resolve this, but let’s first cover the layout cycle, which consists of two steps: Measure and Arrange.

In the Measure step, each TextBlock is measured. This is basically the step where the parent control – in this case the StackPanel – tells each TextBlock “If you have [x,y] space, how much of that would you like to have?”. It does this by calling TextBlock.Measure(Size) on each of them. The TextBlock then reports back the size it would like to have using the .DesiredSize property. You will notice that controls’ DesiredSize property will always return (0,0) until the Measure step has run. Usually for TextBlocks it would report back the size of the text. If the text doesn’t fit within the width that the StackPanel provided and TextWrapping was enabled on the TextBlock, the TextBlock might choose to break the text and report a taller height instead, so it can keep inside the width it was provided with.

The next step is the Arrange step. This occurs after all children has been measured, and the StackPanel here decides how much space it will provide to each control. While the TextBlocks provided a certain DesiredSize, they might not actually get that much space – that’s all up to the parent control – for instance for a Grid’s columns and rows with auto and * sizes, the measure step helped it determine how much space each row and column will be, and then applies that to each element during arrange. Arrange is done by calling .Arrange(Rect) on each element, providing them with a rectangle to place itself within.

So back to our problem: How can we use this knowledge to get the layout cycle to proper place my rotated textblocks?

Well first of all, when we rotate an element 90 degrees, the width of the text becomes the height, and vice-versa. So if we were to “swap” the width and height during Arrange, we should be able to prevent the overlapping and ensure that there’s enough width, errr height for each TextBlock so they don’t overlap. During the arrange step, we can ensure that the elements gets placed right and doesn’t end up outside the containing control.

To do that, the first thing we’ll do is create a new control. Add a new TemplatedControl to your project:
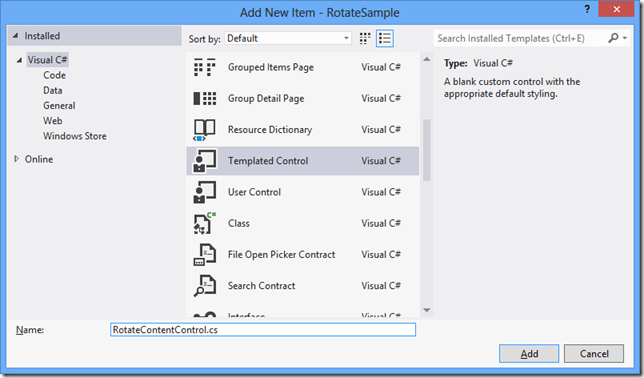
image

A new class inheriting from Control will be created, as well as a new \Themes\Generic.xaml template (if you already have a Generic.xaml file, the following will be added):

Let’s get rid of the Border in this template, and add a simple ContentControl instead:

<ResourceDictionary
    xmlns="http://schemas.microsoft.com/winfx/2006/xaml/presentation"
    xmlns:x="http://schemas.microsoft.com/winfx/2006/xaml"
    xmlns:local="using:RotateSample">

    <Style TargetType="local:RotateContentControl">
        <Setter Property="Template">
            <Setter.Value>
                <ControlTemplate TargetType="local:RotateContentControl">
                    <Border
                        Background="{TemplateBinding Background}"
                        BorderBrush="{TemplateBinding BorderBrush}"
                        BorderThickness="{TemplateBinding BorderThickness}">
                    </Border>
<ContentControl x:Name="Content" Content="{TemplateBinding Content}" />
</ControlTemplate> </Setter.Value> </Setter> </Style> </ResourceDictionary>

Next let’s add a Content dependency property to our class so that we can bind to the content. We’ll also add a Content property to the class, to signify that anything that is used as content inside this control in XAML is meant to be assigned to the Content property. Our control now looks like this:

[Windows.UI.Xaml.Markup.ContentProperty(Name="Content")]
public sealed class RotateContentControl : Control
{
    public RotateContentControl()
    {
        this.DefaultStyleKey = typeof(RotateContentControl);
    }

    public object Content
    {
        get { return (object)GetValue(ContentProperty); }
        set { SetValue(ContentProperty, value); }
    }

    public static readonly DependencyProperty ContentProperty =
        DependencyProperty.Register("Content", typeof(object), typeof(RotateContentControl), null);      
}

Now if we were to run the app using this control, it’ll basically be the same as using a ContentControl.

<local:RotateContentControl>
    <TextBlock Text="Text 1" FontSize="32" Margin="5" />
</local:RotateContentControl>

Of course this is not much fun, so let’s first use the OnApplyTemplate to grab the content and apply the rotation to the content:

private ContentControl m_Content;
private const double rotation = 90;
protected override void OnApplyTemplate()
{
    m_Content = GetTemplateChild("Content") as ContentControl;
    if (m_Content != null)
    {
        m_Content.RenderTransform = new RotateTransform() { Angle = rotation };
    }
    base.OnApplyTemplate();
}

If you run the sample now, we’ll basically be back to where we started with the texts offset and placed outside the parent container. You can see that the StackPanel is highlighted below with the size it thinks it needs to be to hold the TextBlocks, which doesn’t match the actual size of the TextBlocks:
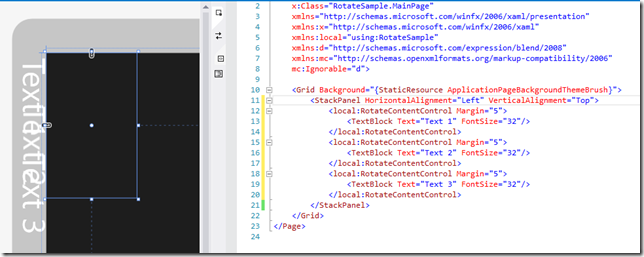
image

So let’s first override the Measure step and swap width and heights:

protected override Windows.Foundation.Size MeasureOverride(Windows.Foundation.Size availableSize)
{
    if (m_Content != null)
    {
        m_Content.Measure(new Size(availableSize.Height, availableSize.Width));
        return new Size(m_Content.DesiredSize.Height, m_Content.DesiredSize.Width);
    }
    else
        return base.MeasureOverride(availableSize);
}

You’ll now see the following happen – notice how the height and width is now correct for the StackPanel if the TextBlocks were rendered in the right place, but we start seeing clipping on the TextBlocks:
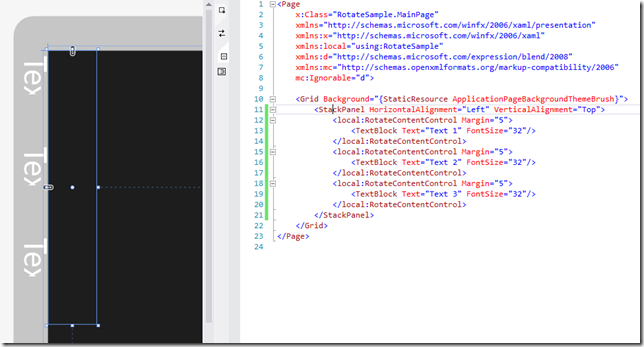
image

This happens because the ArrangeStep still uses the unswapped width/height and causes clipping. Let’s next override the Arrange and swap width and height here as well:

protected override Size ArrangeOverride(Size finalSize)
{
    if (m_Content != null)
    {
        m_Content.Arrange(new Rect(new Point(0, 0), 
new Size(finalSize.Height, finalSize.Width))); return finalSize; } else return base.ArrangeOverride(finalSize); }

And the result we get is:
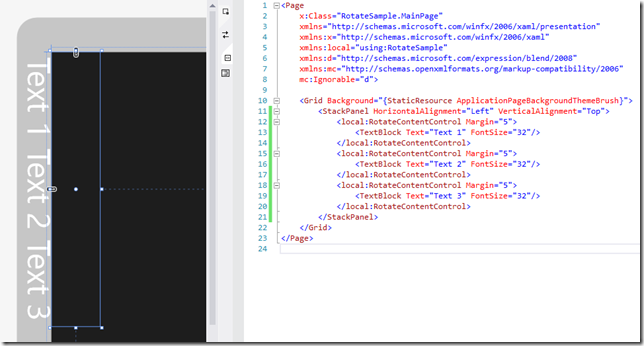
image

Now the text are not overlapping any longer nor are they clipped, but we still get them placed outside the parent StackPanel. This is because the rotation happens around the upper left corner and pushes the text out, as illustrated here:
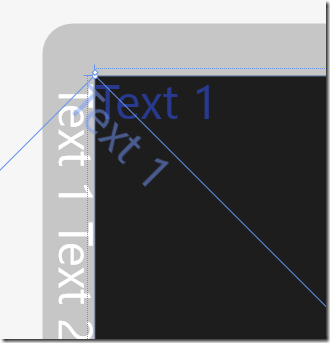
image

Luckily the fix is easy because the Arrange step allows us to specify where to place the element as well. We basically have to move the TextBlock over to the left by the height of the text, so instead of specifying (0,0) for the rectangle corner, we use (width,0), so our Arrange looks like this:

protected override Size ArrangeOverride(Size finalSize)
{
    if (m_Content != null)
    {
        m_Content.Arrange(new Rect(new Point(finalSize.Width, 0), new Size(finalSize.Height, finalSize.Width)));
        return finalSize;
    }
    else
        return base.ArrangeOverride(finalSize);
}

And our controls now flows correctly within the StackPanel:
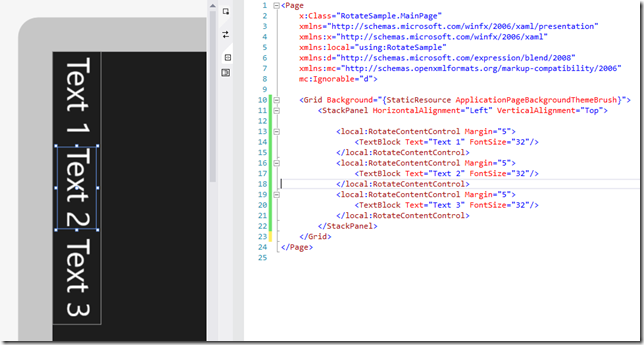
image

It also plays nice with other controls and respects alignments:
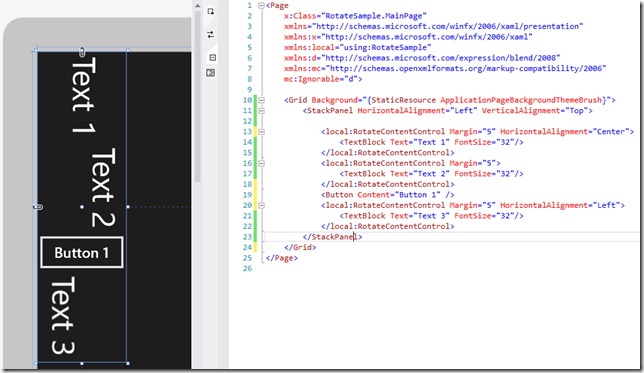
image

If you want to rotate the content –90 degrees, the offset in arrange changes slightly to:

m_Content.Arrange(new Rect(new Point(0, finalSize.Height), 
new Size(finalSize.Height, finalSize.Width)));

We could make this a property on our control, so you can easily change direction on the fly. We’ll add a new Direction enumeration and a DependencyProperty that triggers Arrange when it changes:

public RotateDirection Direction
{
    get { return (RotateDirection)GetValue(DirectionProperty); }
    set { SetValue(DirectionProperty, value); }
}

public static readonly DependencyProperty DirectionProperty =
    DependencyProperty.Register("Direction", typeof(RotateDirection),
typeof(RotateContentControl), new PropertyMetadata(RotateDirection.Down, OnDirectionPropertyChanged)); public static void OnDirectionPropertyChanged(DependencyObject d, DependencyPropertyChangedEventArgs e) { (d as RotateContentControl).InvalidateArrange(); //Trigger reflow }

We’ll also use remove the RenderTransform setting from OnApplyTemplate, and instead set it in ArrangeOverride, so that now looks like this:

protected override Size ArrangeOverride(Size finalSize)
{
    if (m_Content != null)
    {
        m_Content.RenderTransform = new RotateTransform() { Angle = (int)this.Direction };
        if (Direction == RotateDirection.Down)
            m_Content.Arrange(new Rect(new Point(finalSize.Width, 0), 
new Size(finalSize.Height, finalSize.Width))); else if (Direction == RotateDirection.Up) m_Content.Arrange(new Rect(new Point(0, finalSize.Height),
new Size(finalSize.Height, finalSize.Width))); return finalSize; } else return base.ArrangeOverride(finalSize); }

So here’s what that looks like in the designer:
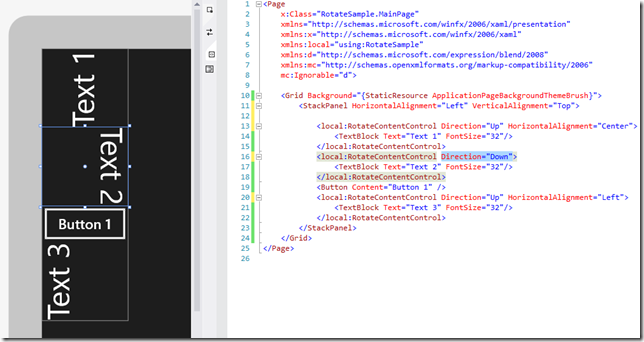
image

That’s it! Below is the entire source code including support for 0 and 180 degree rotations as well:

using Windows.Foundation;
using Windows.UI.Xaml;
using Windows.UI.Xaml.Controls;
using Windows.UI.Xaml.Media;

namespace RotateSample
{
    [Windows.UI.Xaml.Markup.ContentProperty(Name="Content")]
    public sealed class RotateContentControl : Control
    {
        private ContentControl m_Content;

        public RotateContentControl()
        {
            this.DefaultStyleKey = typeof(RotateContentControl);
        }

        protected override void OnApplyTemplate()
        {
            m_Content = GetTemplateChild("Content") as ContentControl;
            base.OnApplyTemplate();
        }

        protected override Windows.Foundation.Size MeasureOverride(Windows.Foundation.Size availableSize)
        {
            if (m_Content != null)
            {
                if (((int)Direction) % 180 == 90)
                {
                    m_Content.Measure(new Windows.Foundation.Size(availableSize.Height, availableSize.Width));
                    return new Size(m_Content.DesiredSize.Height, m_Content.DesiredSize.Width);
                }
                else
                {
                    m_Content.Measure(availableSize);
                    return m_Content.DesiredSize;
                }
            }
            else
                return base.MeasureOverride(availableSize);
        }

        protected override Size ArrangeOverride(Size finalSize)
        {
            if (m_Content != null)
            {
                m_Content.RenderTransform = new RotateTransform() { Angle = (int)this.Direction };
                if (Direction == RotateDirection.Up)
                    m_Content.Arrange(new Rect(new Point(0, finalSize.Height),
                                      new Size(finalSize.Height, finalSize.Width)));
                else if (Direction == RotateDirection.Down)
                    m_Content.Arrange(new Rect(new Point(finalSize.Width, 0), 
                                      new Size(finalSize.Height, finalSize.Width)));
                else if (Direction == RotateDirection.UpsideDown)
                    m_Content.Arrange(new Rect(new Point(finalSize.Width, finalSize.Height), finalSize));
                else
                    m_Content.Arrange(new Rect(new Point(), finalSize));
                return finalSize;
            }
            else
                return base.ArrangeOverride(finalSize);
        }


        public object Content
        {
            get { return (object)GetValue(ContentProperty); }
            set { SetValue(ContentProperty, value); }
        }

        public static readonly DependencyProperty ContentProperty =
            DependencyProperty.Register("Content", typeof(object), typeof(RotateContentControl), null);

        public enum RotateDirection : int
        {
            Normal = 0,
            Down = 90,
            UpsideDown = 180,
            Up = 270
        }

        public RotateDirection Direction
        {
            get { return (RotateDirection)GetValue(DirectionProperty); }
            set { SetValue(DirectionProperty, value); }
        }

        public static readonly DependencyProperty DirectionProperty =
            DependencyProperty.Register("Direction", typeof(RotateDirection),
            typeof(RotateContentControl), new PropertyMetadata(RotateDirection.Down, OnDirectionPropertyChanged));

        public static void OnDirectionPropertyChanged(DependencyObject d, DependencyPropertyChangedEventArgs e)
        {
            if(((int)e.OldValue) % 180 == ((int)e.NewValue) % 180)
                (d as RotateContentControl).InvalidateArrange(); //flipping 180 degrees only changes flow not size
            else
                (d as RotateContentControl).InvalidateMeasure(); //flipping 90 or 270 degrees changes size too, so remeasure
        }
    }
}

Note: While this article was written for Windows Store apps, these concepts apply directly to Silverlight, WPF and Windows Phone as well, albeit they already provide controls in the Toolkit (LayoutTransformer) to handle this.

Running a Storyboard as a Task

Sometimes you have some code that needs to run after a storyboard has completed. In my case I'm working on a little board game, and after each move (which I animate using a Storyboard), I need to figure out the next move, and either start a new play-animation or pass the turn to the other player.

Therefore I run in a loop until the turn is over. You can detect when a storyboard has finished when the "Completed" event triggers, but that makes for some recursive spaghetti code. It's much easier if I could just "await" the storyboard using a task. So I created the little extension method below that makes this possible. All you have to do to start and wait for the storyboard to finish is:

    await myStoryboard.BeginAsync();

Below is the little extension method (which also serves as a general example on how you turn an event-based class into an awaitable Task using the TaskCompletionSource):

using System;
using System.Threading.Tasks;
using Windows.UI.Xaml.Media.Animation;

namespace SharpGIS
{
    public static class StoryboardExtensions
    {
        public static Task BeginAsync(this Storyboard storyboard)
        {
            System.Threading.Tasks.TaskCompletionSource<bool> tcs = new TaskCompletionSource<bool>();
            if (storyboard == null)
                tcs.SetException(new ArgumentNullException());
            else
            {
                EventHandler<object> onComplete = null;
                onComplete = (s, e) => {
                    storyboard.Completed -= onComplete; 
                    tcs.SetResult(true); 
                };
                storyboard.Completed += onComplete;
                storyboard.Begin();
            }
            return tcs.Task;
        }
    }
}

Note: This code is written for WinRT. If you want to use this for Silverlight or WPF, just change ‘Eventhandler<object>’ to ‘EventHandler’.

Creating a DirectX XAML control using C++/CX

With Windows 8 Metro style apps, you can now also build XAML controls not only with C# and VB.NET but also with C++. If you are a .NET developer you will probably wonder why you would do that – and granted there might be several reasons you wouldn’t. However there is a few nice things about C++ that .NET libraries doesn’t give you:
1. You can use existing C++ libraries and link them directly in. This will allow you to re-use an enormous amount of code already out there.
2. DirectX is a first-class citizen in C++ 11, and officially the only way to use DirectX in XAML (although there are ways to access this from C#).

If you need high-performance rendering or 3D, DirectX is the way to go on the Windows Platform, and finally we can effortless mix DX and XAML (well at least compared to how it was in WPF). So this blogpost will show you how to build the base control you will need to make DirectX-in-XAML possible.

If you haven’t made any custom controls before, I urge you to read my earlier post on why they are so awesome and how they work: Why Custom Controls are underrated

So let’s open up Visual Studio 11, and go: New Project –> Visual C++ –> WinRT Component DLL

image

The project will create a new component class: WinRTComponent.cpp/.h. Delete these two files. We won’t need them. Instead, right-click project –> Add new item, and pick “Templated Control”.

image

This will add 3 new files, where the first two are:

MyDirectXControl.h:

#pragma once

#include "pch.h"

namespace MyControlsLibrary
{
    public ref class MyDirectXControl sealed : public Windows::UI::Xaml::Controls::Control
    {
    public:
        MyDirectXControl();
    };
}

MyDirectXControl.cpp:

#include "pch.h"
#include "MyDirectXControl.h"

using namespace MyControlsLibrary;

using namespace Platform;
using namespace Windows::Foundation;
using namespace Windows::Foundation::Collections;
using namespace Windows::UI::Xaml;
using namespace Windows::UI::Xaml::Controls;
using namespace Windows::UI::Xaml::Data;
using namespace Windows::UI::Xaml::Documents;
using namespace Windows::UI::Xaml::Input;
using namespace Windows::UI::Xaml::Interop;
using namespace Windows::UI::Xaml::Media;

MyDirectXControl::MyDirectXControl()
{
    DefaultStyleKey = "MyControlsLibrary.MyDirectXControl";
}

Also notice the comment at the top of the header file. This is important, and tells you to go open “pch.h” and add the following line at the bottom:

#include "MyDirectXControl.h"

I ignored this comment (ie. my brain refused to notice it) for hours until a friendly soul pointed it out – kinda annoying but just do it and move along.

The third file is the “Generic.xaml” template file. This is where the XAML that should be applied to the control is defined (this is exactly the same as in C#/VB.NET). We will open this and add a couple of minor changes highlighted in yellow, and remove the line crossed out:

<ResourceDictionary
    xmlns="http://schemas.microsoft.com/winfx/2006/xaml/presentation"
    xmlns:x="http://schemas.microsoft.com/winfx/2006/xaml"
    xmlns:local="using:MyControlsLibrary">

    <Style TargetType="local:MyDirectXControl">
        <Setter Property="Template">
            <Setter.Value>
                <ControlTemplate TargetType="local:MyDirectXControl">
                    <Border x:Name="DrawSurface"
                        Background="{TemplateBinding Background}"
                        BorderBrush="{TemplateBinding BorderBrush}"
                        BorderThickness="{TemplateBinding BorderThickness}">
                        <TextBlock Text="My DirectX Control" 
                                   HorizontalAlignment="Center"
                                   VerticalAlignment="Center" />
                    </Border>
                </ControlTemplate>
            </Setter.Value>
        </Setter>
    </Style>
</ResourceDictionary>

We name the border so we can get a reference to it from code behind (which we will get back to later), and also add a little text in the center just for fun.

Next let’s try and use this control in a C# app. Right-click on your solution and select Add New Project. Pick a blank C# Metro style application.

image

Right-click the “references” in this new project and select “Add references” and select your other project under the “Solutions” tab:

image

Now open BlankPage.xaml and add the highlighted sections:

<Page
    x:Class="Application1.BlankPage"
    xmlns="http://schemas.microsoft.com/winfx/2006/xaml/presentation"
    xmlns:x="http://schemas.microsoft.com/winfx/2006/xaml"
    xmlns:local="using:Application1"
    xmlns:d="http://schemas.microsoft.com/expression/blend/2008"
    xmlns:mc="http://schemas.openxmlformats.org/markup-compatibility/2006"
    xmlns:my="using:MyControlsLibrary"
    mc:Ignorable="d">

    <Grid Background="{StaticResource ApplicationPageBackgroundBrush}">
        
        <my:MyDirectXControl Background="Red" Width="400" Height="300" />
        
    </Grid>
</Page>

And you should see the control pop up in your designer (you won’t see the red color yet – I left it so you can better see it in this screenshot):

image

Awesome! We now got a XAML control built in C++ consumed by C#!
Now let’s continue and add some DirectX magic to this control…

The first step for this is to include the DirectX libraries. If you are a .net developer, it’s kinda like adding assembly references (but the experience will feel 1980s :-). Right-click your C++ project and select Properties. Navigate to Linker->Input, and add the following to “Additional Dependencies”: d2d1.lib;d3d11.lib;

image

Next, lets add some methods, overrides and private variables to MyDirectXControl.h file that we’ll be using for the our directx rendering:

#pragma once
#include <d3d11_1.h>
#include <dxgi1_2.h>
#include <wrl.h>
#include <windows.ui.xaml.media.dxinterop.h>

#include "pch.h"

namespace MyControlsLibrary
{
    public ref class MyDirectXControl sealed : public Windows::UI::Xaml::Controls::Control
    {
    public:
        MyDirectXControl();
        virtual void OnApplyTemplate() override;
        void Refresh();

    private:
        Windows::UI::Xaml::Media::Imaging::SurfaceImageSource^ CreateImageSource(int width, int height);
        void OnMapSurfaceSizeChanged(Platform::Object^ sender, Windows::UI::Xaml::SizeChangedEventArgs^ e);
        void Draw(int width, int height);

        // template child that holds the UI Element
        Windows::UI::Xaml::Controls::Border^                m_MapSurfaceElement;
        // surface image source
        Windows::UI::Xaml::Media::Imaging::SurfaceImageSource^ m_imageSource;
        // Native interface of the surface image source
        Microsoft::WRL::ComPtr<ISurfaceImageSourceNative>   m_imageSourceNative;
        // D3D device
        Microsoft::WRL::ComPtr<ID3D11Device>                m_d3dDevice;
        Microsoft::WRL::ComPtr<ID3D11DeviceContext>         m_d3dContext;
Windows::Foundation::EventRegistrationToken m_sizeChangedToken; }; }

The first we’ll implement is the “CreateImageSource” method which will generate a DirectX surface we can render to. We’ll be using SurfaceImageSource which is one of the 3 types of DirectX surfaces we can use for this:

using namespace Windows::UI::Xaml::Media::Imaging;
[...]
SurfaceImageSource^ MyDirectXControl::CreateImageSource(int width, int height)
{
    //Define the size of the shared surface by passing the height and width to 
    //the SurfaceImageSource constructor. You can also indicate whether the surface
    //needs alpha (opacity) support.
    SurfaceImageSource^  surfaceImageSource = ref new SurfaceImageSource(width, height, true);
    if(width <= 0 || height <= 0) return surfaceImageSource;
    

    //Get a pointer to ISurfaceImageSourceNative. Cast the SurfaceImageSource object
    //as IInspectable (or IUnknown), and call QueryInterface on it to get the underlying
    //ISurfaceImageSourceNative implementation. You use the methods defined on this 
    //implementation to set the device and run the draw operations.
    IInspectable* sisInspectable = (IInspectable*) reinterpret_cast<IInspectable*>(surfaceImageSource);
    sisInspectable->QueryInterface(__uuidof(ISurfaceImageSourceNative), (void **)&m_imageSourceNative);

    //Set the DXGI device by first calling D3D11CreateDevice and then passing the device and 
    //context to ISurfaceImageSourceNative::SetDevice. 

    // This flag adds support for surfaces with a different color channel ordering than the API default.
    // It is recommended usage, and is required for compatibility with Direct2D.
    UINT creationFlags = D3D11_CREATE_DEVICE_BGRA_SUPPORT;

#if defined(_DEBUG)
    // If the project is in a debug build, enable debugging via SDK Layers with this flag.
    creationFlags |= D3D11_CREATE_DEVICE_DEBUG;
#endif
     // This array defines the set of DirectX hardware feature levels this app will support.
    // Note the ordering should be preserved.
    D3D_FEATURE_LEVEL featureLevels[] = 
    {
        D3D_FEATURE_LEVEL_11_1,
        D3D_FEATURE_LEVEL_11_0,
        D3D_FEATURE_LEVEL_10_1,
        D3D_FEATURE_LEVEL_10_0,
        D3D_FEATURE_LEVEL_9_3,
        D3D_FEATURE_LEVEL_9_2,
        D3D_FEATURE_LEVEL_9_1
    };

    HRESULT hr = D3D11CreateDevice(
            NULL,
            D3D_DRIVER_TYPE_HARDWARE,
            NULL,
            creationFlags,
            featureLevels,
            ARRAYSIZE(featureLevels),
            D3D11_SDK_VERSION,
            &m_d3dDevice,
            NULL,
            &m_d3dContext
            );
if(FAILED(hr))
throw ref new COMException(hr); Microsoft::WRL::ComPtr<IDXGIDevice> dxgiDevice; // Obtain the underlying DXGI device of the Direct3D11.1 device. m_d3dDevice.As(&dxgiDevice); m_imageSourceNative->SetDevice(dxgiDevice.Get()); return surfaceImageSource; }

This is all boiler-plate code from MSDN. You can find more information there about what the above code really do.

The next portion is the code that will actually do the draw. I’ll keep it simple here and just grab the background color of the control, and render that color to the surface.

using namespace Microsoft::WRL;
[...]
void MyDirectXControl::Draw(int width, int height)
{
    if(width <= 0 ||  height <= 0) return;
    ComPtr<IDXGISurface> surface;
    RECT updateRect = {0};
    updateRect.left = 0;
    updateRect.right = width;
    updateRect.top = 0;
    updateRect.bottom = height;
    POINT offset = {0};
    
    //Provide a pointer to IDXGISurface object to ISurfaceImageSourceNative::BeginDraw, and 
    //draw into that surface using DirectX. Only the area specified for update in the 
    //updateRect parameter is drawn. 
    //
    //This method returns the point (x,y) offset of the updated target rectangle in the offset
    //parameter. You use this offset to determine where to draw into inside the IDXGISurface.
    HRESULT beginDrawHR = m_imageSourceNative->BeginDraw(updateRect, &surface, &offset);
    if (beginDrawHR == DXGI_ERROR_DEVICE_REMOVED || beginDrawHR == DXGI_ERROR_DEVICE_RESET)
    {
              // device changed
    }
    else
    {
        // draw to IDXGISurface (the surface paramater)
        // get D3D texture from surface returned by BeginDraw
        ComPtr<ID3D11Texture2D> d3DTexture;
        surface.As(&d3DTexture);
        // create render target view
        ComPtr<ID3D11RenderTargetView> m_renderTargetView;
        m_d3dDevice->CreateRenderTargetView(d3DTexture.Get(), nullptr, &m_renderTargetView);
        auto brush = (SolidColorBrush^)this->Background;
        float a = brush->Color.A/255.0f;
        float r = brush->Color.R/255.0f;
        float g = brush->Color.G/255.0f;
        float b = brush->Color.B/255.0f;
         const float clearColor[4] = { r, g, b, a };
         m_d3dContext->ClearRenderTargetView(m_renderTargetView.Get(),clearColor);
    }

    // TODO: Add more draw calls here

    //Call ISurfaceImageSourceNative::EndDraw to complete the bitmap. Pass this bitmap to an ImageBrush.
    m_imageSourceNative->EndDraw();
}

The next thing we’ll implement is “OnApplyTemplate”, which is called when the template in Generic.xaml is applied. At this point we can get a reference to the Border element, and apply the SurfaceImageSource as a brush to the background of the border.

void MyDirectXControl::OnApplyTemplate() 
{
if(m_MapSurfaceElement != nullptr)
    {   
        m_MapSurfaceElement->SizeChanged -= m_sizeChangedToken;
        m_MapSurfaceElement = nullptr;
    }
    //Get template child for draw surface
    m_MapSurfaceElement = (Border^)GetTemplateChild("DrawSurface");
    if(m_MapSurfaceElement != nullptr)
    {
        int width = (int)m_MapSurfaceElement->ActualWidth;
        int height = (int)m_MapSurfaceElement->ActualHeight;
        m_imageSource = CreateImageSource(width, height);
        ImageBrush^ brush = ref new ImageBrush();
        brush->ImageSource = m_imageSource;
        m_MapSurfaceElement->Background = brush;
        m_sizeChangedToken = m_MapSurfaceElement->SizeChanged += 
ref new SizeChangedEventHandler(this, &MyDirectXControl::OnMapSurfaceSizeChanged); } }

Also notice that we attached a handler to when the border element changes its size. If this happen we need to recreate the surface and render it again:

//surface size changed handler
void MyDirectXControl::OnMapSurfaceSizeChanged(Platform::Object^ sender, Windows::UI::Xaml::SizeChangedEventArgs^ e)
{
    int width = (int)m_MapSurfaceElement->ActualWidth;
    int height = (int)m_MapSurfaceElement->ActualHeight;
    m_imageSource = CreateImageSource(width, height);
    Draw(width, height);
    ImageBrush^ brush = ref new ImageBrush();
    brush->ImageSource = m_imageSource;
    m_MapSurfaceElement->Background = brush;
}

Lastly, we have a Refresh() method that triggers a new draw. You can call this on your control to trigger a new rendering. Calls to should be triggered by a pulse and only happen when there’s something new to draw (like for instance changing the background brush).

void MyDirectXControl::Refresh()
{
    int width = (int)m_MapSurfaceElement->ActualWidth;
    int height = (int)m_MapSurfaceElement->ActualHeight;
    Draw(width, height);
}

And that’s it! We now have a complete XAML control that you can use in both your .NET and C++ XAML apps.

You can download the entire sample app here.

Also a big thanks goes out to Jeremiah Morrill for peer-reviewing this blog-post.

TiltEffect for Windows 8 Metro XAML

The tiles on the new Windows 8 Start Menu “tilts” when you press them, tilting toward the direction you click/touch them. This effect is also well known from the Windows Phone tiles. Unfortunately there is no out-of-the-box way of accomplishing this in either of the platforms. However for Windows Phone, a TiltEffect class is in the Silverlight Toolkit, so I figured I could just port that. Turns out it wasn’t that hard – all I pretty much had to do was change the manipulation events to use the new Pointer events instead, and will work with both mouse and touch.

To use it, first download the updated tilt effect class and add it to your project.

Next add a xmlns to register the namespace for use in XAML:

     xmlns:sg="using:SharpGIS.Metro.Controls"

And lastly add the tilt effect to your control exactly like  you would on the phone:

    <Rectangle Width="200" Height="200" Fill="Blue"
        sg:TiltEffect.IsTiltEnabled="True" />

Here’s what this look like on a couple of animated panels:

It’s worth noting that the tilt effect is not EXACTLY the same as the Windows 8 start menu, but it’s fairly close (and a bit cooler if you ask me Smile)