With Windows 8 Metro style apps, you can now also build XAML controls not only with C# and VB.NET but also with C++. If you are a .NET developer you will probably wonder why you would do that – and granted there might be several reasons you wouldn’t. However there is a few nice things about C++ that .NET libraries doesn’t give you:
1. You can use existing C++ libraries and link them directly in. This will allow you to re-use an enormous amount of code already out there.
2. DirectX is a first-class citizen in C++ 11, and officially the only way to use DirectX in XAML (although there are ways to access this from C#).
If you need high-performance rendering or 3D, DirectX is the way to go on the Windows Platform, and finally we can effortless mix DX and XAML (well at least compared to how it was in WPF). So this blogpost will show you how to build the base control you will need to make DirectX-in-XAML possible.
If you haven’t made any custom controls before, I urge you to read my earlier post on why they are so awesome and how they work: Why Custom Controls are underrated
So let’s open up Visual Studio 11, and go: New Project –> Visual C++ –> WinRT Component DLL
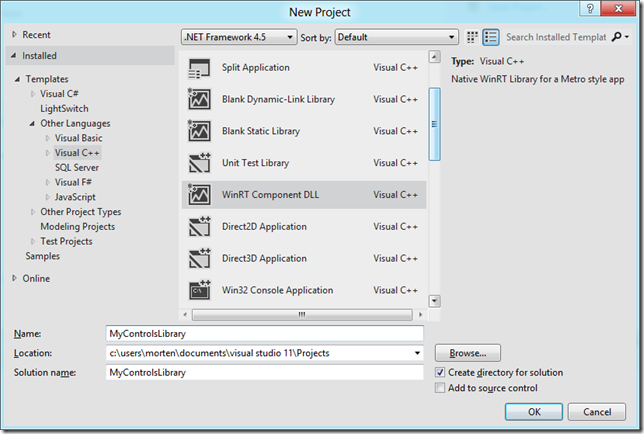
The project will create a new component class: WinRTComponent.cpp/.h. Delete these two files. We won’t need them. Instead, right-click project –> Add new item, and pick “Templated Control”.
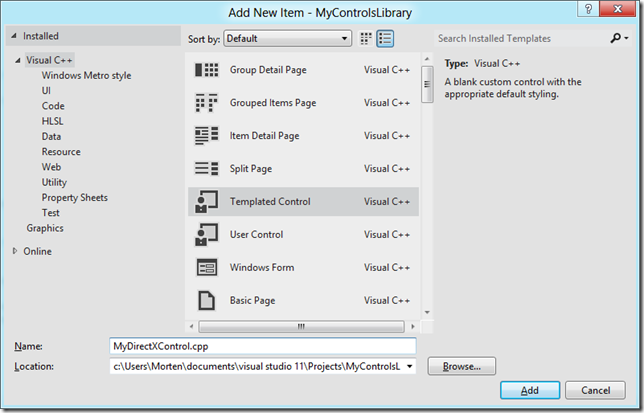
This will add 3 new files, where the first two are:
MyDirectXControl.h:
#pragma once

#include "pch.h"

namespace MyControlsLibrary
{
    public ref class MyDirectXControl sealed : public Windows::UI::Xaml::Controls::Control
    {
    public:
        MyDirectXControl();
    };
}
MyDirectXControl.cpp:
#include "pch.h"
#include "MyDirectXControl.h"

using namespace MyControlsLibrary;

using namespace Platform;
using namespace Windows::Foundation;
using namespace Windows::Foundation::Collections;
using namespace Windows::UI::Xaml;
using namespace Windows::UI::Xaml::Controls;
using namespace Windows::UI::Xaml::Data;
using namespace Windows::UI::Xaml::Documents;
using namespace Windows::UI::Xaml::Input;
using namespace Windows::UI::Xaml::Interop;
using namespace Windows::UI::Xaml::Media;

MyDirectXControl::MyDirectXControl()
{
    DefaultStyleKey = "MyControlsLibrary.MyDirectXControl";
}
Also notice the comment at the top of the header file. This is important, and tells you to go open “pch.h” and add the following line at the bottom:
#include "MyDirectXControl.h"
I ignored this comment (ie. my brain refused to notice it) for hours until a friendly soul pointed it out – kinda annoying but just do it and move along.
The third file is the “Generic.xaml” template file. This is where the XAML that should be applied to the control is defined (this is exactly the same as in C#/VB.NET). We will open this and add a couple of minor changes highlighted in yellow, and remove the line crossed out:
<ResourceDictionary
    xmlns="http://schemas.microsoft.com/winfx/2006/xaml/presentation"
    xmlns:x="http://schemas.microsoft.com/winfx/2006/xaml"
    xmlns:local="using:MyControlsLibrary">

    <Style TargetType="local:MyDirectXControl">
        <Setter Property="Template">
            <Setter.Value>
                <ControlTemplate TargetType="local:MyDirectXControl">
                    <Border x:Name="DrawSurface"
                        Background="{TemplateBinding Background}"
                        BorderBrush="{TemplateBinding BorderBrush}"
                        BorderThickness="{TemplateBinding BorderThickness}">
                        <TextBlock Text="My DirectX Control"
                                   HorizontalAlignment="Center"
                                   VerticalAlignment="Center" />
                    </Border>
                </ControlTemplate>
            </Setter.Value>
        </Setter>
    </Style>
</ResourceDictionary>
We name the border so we can get a reference to it from code behind (which we will get back to later), and also add a little text in the center just for fun.
Next let’s try and use this control in a C# app. Right-click on your solution and select Add New Project. Pick a blank C# Metro style application.
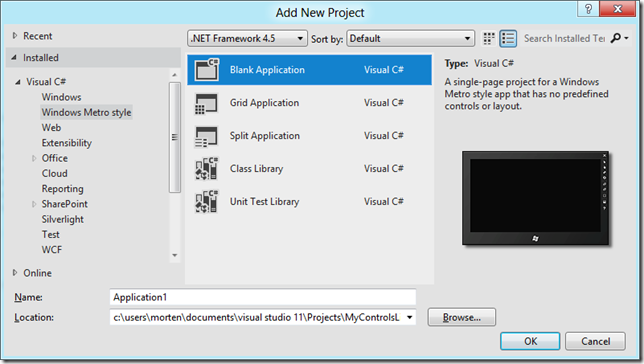
Right-click the “references” in this new project and select “Add references” and select your other project under the “Solutions” tab:

Now open BlankPage.xaml and add the highlighted sections:
<Page
    x:Class="Application1.BlankPage"
    xmlns="http://schemas.microsoft.com/winfx/2006/xaml/presentation"
    xmlns:x="http://schemas.microsoft.com/winfx/2006/xaml"
    xmlns:local="using:Application1"
    xmlns:d="http://schemas.microsoft.com/expression/blend/2008"
    xmlns:mc="http://schemas.openxmlformats.org/markup-compatibility/2006"
    xmlns:my="using:MyControlsLibrary"
    mc:Ignorable="d">

    <Grid Background="{StaticResource ApplicationPageBackgroundBrush}">

        <my:MyDirectXControl Background="Red" Width="400" Height="300" />

    </Grid>
</Page>
And you should see the control pop up in your designer (you won’t see the red color yet – I left it so you can better see it in this screenshot):
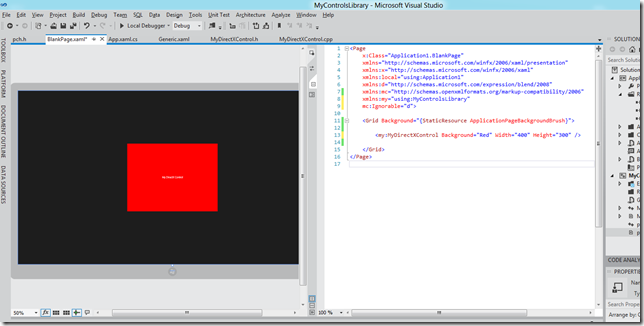
Awesome! We now got a XAML control built in C++ consumed by C#!
Now let’s continue and add some DirectX magic to this control…
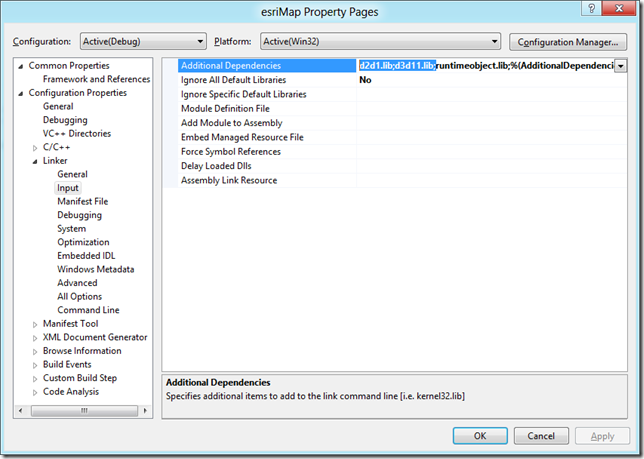
The first step for this is to include the DirectX libraries. If you are a .net developer, it’s kinda like adding assembly references (but the experience will feel 1980s :-). Right-click your C++ project and select Properties. Navigate to Linker->Input, and add the following to “Additional Dependencies”: d2d1.lib;d3d11.lib;
Next, lets add some methods, overrides and private variables to MyDirectXControl.h file that we’ll be using for the our directx rendering:
#pragma once
#include <d3d11_1.h>
#include <dxgi1_2.h>
#include <wrl.h>
#include <windows.ui.xaml.media.dxinterop.h>

#include "pch.h"

namespace MyControlsLibrary
{
    public ref class MyDirectXControl sealed : public Windows::UI::Xaml::Controls::Control
    {
    public:
        MyDirectXControl();
        virtual void OnApplyTemplate() override;
        void Refresh();

    private:
        Windows::UI::Xaml::Media::Imaging::SurfaceImageSource^ CreateImageSource(int width, int height);
        void OnMapSurfaceSizeChanged(Platform::Object^ sender, Windows::UI::Xaml::SizeChangedEventArgs^ e);
        void Draw(int width, int height);

        // template child that holds the UI Element
        Windows::UI::Xaml::Controls::Border^                m_MapSurfaceElement;
        // surface image source
        Windows::UI::Xaml::Media::Imaging::SurfaceImageSource^ m_imageSource;
        // Native interface of the surface image source
        Microsoft::WRL::ComPtr<ISurfaceImageSourceNative>   m_imageSourceNative;
        // D3D device
        Microsoft::WRL::ComPtr<ID3D11Device>                m_d3dDevice;
        Microsoft::WRL::ComPtr<ID3D11DeviceContext>         m_d3dContext;
        Windows::Foundation::EventRegistrationToken         m_sizeChangedToken;
    };
}
The first we’ll implement is the “CreateImageSource” method which will generate a DirectX surface we can render to. We’ll be using SurfaceImageSource which is one of the 3 types of DirectX surfaces we can use for this:
using namespace Windows::UI::Xaml::Media::Imaging;
[...]
SurfaceImageSource^ MyDirectXControl::CreateImageSource(int width, int height)
{
    //Define the size of the shared surface by passing the height and width to
    //the SurfaceImageSource constructor. You can also indicate whether the surface
    //needs alpha (opacity) support.
    SurfaceImageSource^  surfaceImageSource = ref new SurfaceImageSource(width, height, true);
    if(width <= 0 || height <= 0) return surfaceImageSource;


    //Get a pointer to ISurfaceImageSourceNative. Cast the SurfaceImageSource object
    //as IInspectable (or IUnknown), and call QueryInterface on it to get the underlying
    //ISurfaceImageSourceNative implementation. You use the methods defined on this
    //implementation to set the device and run the draw operations.
    IInspectable* sisInspectable = (IInspectable*) reinterpret_cast<IInspectable*>(surfaceImageSource);
    sisInspectable->QueryInterface(__uuidof(ISurfaceImageSourceNative), (void **)&m_imageSourceNative);

    //Set the DXGI device by first calling D3D11CreateDevice and then passing the device and
    //context to ISurfaceImageSourceNative::SetDevice.

    // This flag adds support for surfaces with a different color channel ordering than the API default.
    // It is recommended usage, and is required for compatibility with Direct2D.
    UINT creationFlags = D3D11_CREATE_DEVICE_BGRA_SUPPORT;

#if defined(_DEBUG)
    // If the project is in a debug build, enable debugging via SDK Layers with this flag.
    creationFlags |= D3D11_CREATE_DEVICE_DEBUG;
#endif
     // This array defines the set of DirectX hardware feature levels this app will support.
    // Note the ordering should be preserved.
    D3D_FEATURE_LEVEL featureLevels[] =
    {
        D3D_FEATURE_LEVEL_11_1,
        D3D_FEATURE_LEVEL_11_0,
        D3D_FEATURE_LEVEL_10_1,
        D3D_FEATURE_LEVEL_10_0,
        D3D_FEATURE_LEVEL_9_3,
        D3D_FEATURE_LEVEL_9_2,
        D3D_FEATURE_LEVEL_9_1
    };

    HRESULT hr = D3D11CreateDevice(
            NULL,
            D3D_DRIVER_TYPE_HARDWARE,
            NULL,
            creationFlags,
            featureLevels,
            ARRAYSIZE(featureLevels),
            D3D11_SDK_VERSION,
            &m_d3dDevice,
            NULL,
            &m_d3dContext
            );
    if(FAILED(hr))
      throw ref new COMException(hr);
    Microsoft::WRL::ComPtr<IDXGIDevice> dxgiDevice;
    // Obtain the underlying DXGI device of the Direct3D11.1 device.
    m_d3dDevice.As(&dxgiDevice);
    m_imageSourceNative->SetDevice(dxgiDevice.Get());

    return surfaceImageSource;
}
This is all boiler-plate code from MSDN. You can find more information there about what the above code really do.
The next portion is the code that will actually do the draw. I’ll keep it simple here and just grab the background color of the control, and render that color to the surface.
using namespace Microsoft::WRL;
[...]
void MyDirectXControl::Draw(int width, int height)
{
    if(width <= 0 ||  height <= 0) return;
    ComPtr<IDXGISurface> surface;
    RECT updateRect = {0};
    updateRect.left = 0;
    updateRect.right = width;
    updateRect.top = 0;
    updateRect.bottom = height;
    POINT offset = {0};

    //Provide a pointer to IDXGISurface object to ISurfaceImageSourceNative::BeginDraw, and
    //draw into that surface using DirectX. Only the area specified for update in the
    //updateRect parameter is drawn.
    //
    //This method returns the point (x,y) offset of the updated target rectangle in the offset
    //parameter. You use this offset to determine where to draw into inside the IDXGISurface.
    HRESULT beginDrawHR = m_imageSourceNative->BeginDraw(updateRect, &surface, &offset);
    if (beginDrawHR == DXGI_ERROR_DEVICE_REMOVED || beginDrawHR == DXGI_ERROR_DEVICE_RESET)
    {
              // device changed
    }
    else
    {
        // draw to IDXGISurface (the surface paramater)
        // get D3D texture from surface returned by BeginDraw
        ComPtr<ID3D11Texture2D> d3DTexture;
        surface.As(&d3DTexture);
        // create render target view
        ComPtr<ID3D11RenderTargetView> m_renderTargetView;
        m_d3dDevice->CreateRenderTargetView(d3DTexture.Get(), nullptr, &m_renderTargetView);
        auto brush = (SolidColorBrush^)this->Background;
        float a = brush->Color.A/255.0f;
        float r = brush->Color.R/255.0f;
        float g = brush->Color.G/255.0f;
        float b = brush->Color.B/255.0f;
         const float clearColor[4] = { r, g, b, a };
         m_d3dContext->ClearRenderTargetView(m_renderTargetView.Get(),clearColor);
    }

    // TODO: Add more draw calls here

    //Call ISurfaceImageSourceNative::EndDraw to complete the bitmap. Pass this bitmap to an ImageBrush.
    m_imageSourceNative->EndDraw();
}
The next thing we’ll implement is “OnApplyTemplate”, which is called when the template in Generic.xaml is applied. At this point we can get a reference to the Border element, and apply the SurfaceImageSource as a brush to the background of the border.
void MyDirectXControl::OnApplyTemplate()
{
    if(m_MapSurfaceElement != nullptr)
    {
        m_MapSurfaceElement->SizeChanged -= m_sizeChangedToken;
        m_MapSurfaceElement = nullptr;
    }
    //Get template child for draw surface
    m_MapSurfaceElement = (Border^)GetTemplateChild("DrawSurface");
    if(m_MapSurfaceElement != nullptr)
    {
        int width = (int)m_MapSurfaceElement->ActualWidth;
        int height = (int)m_MapSurfaceElement->ActualHeight;
        m_imageSource = CreateImageSource(width, height);
        ImageBrush^ brush = ref new ImageBrush();
        brush->ImageSource = m_imageSource;
        m_MapSurfaceElement->Background = brush;
        m_sizeChangedToken = m_MapSurfaceElement->SizeChanged +=
             ref new SizeChangedEventHandler(this, &MyDirectXControl::OnMapSurfaceSizeChanged);
    }
}
Also notice that we attached a handler to when the border element changes its size. If this happen we need to recreate the surface and render it again:
//surface size changed handler
void MyDirectXControl::OnMapSurfaceSizeChanged(Platform::Object^ sender, Windows::UI::Xaml::SizeChangedEventArgs^ e)
{
    int width = (int)m_MapSurfaceElement->ActualWidth;
    int height = (int)m_MapSurfaceElement->ActualHeight;
    m_imageSource = CreateImageSource(width, height);
    Draw(width, height);
    ImageBrush^ brush = ref new ImageBrush();
    brush->ImageSource = m_imageSource;
    m_MapSurfaceElement->Background = brush;
}
Lastly, we have a Refresh() method that triggers a new draw. You can call this on your control to trigger a new rendering. Calls to should be triggered by a pulse and only happen when there’s something new to draw (like for instance changing the background brush).
void MyDirectXControl::Refresh()
{
    int width = (int)m_MapSurfaceElement->ActualWidth;
    int height = (int)m_MapSurfaceElement->ActualHeight;
    Draw(width, height);
}
And that’s it! We now have a complete XAML control that you can use in both your .NET and C++ XAML apps.
You can download the entire sample app here.
Also a big thanks goes out to Jeremiah Morrill for peer-reviewing this blog-post.